You can upload all products from the same category in one XLS-file at once.
If your product has several variants, for example, different color, size, or weight, each of them will be a separate product. For example, a size 42 T-shirt and a similar size 44 T-shirt are different products. You can merge them on a single PDP.
Uploading products #
Before each upload, download a new template in your profile. We regularly update templates to keep them as accurate and convenient as possible. Don’t use templates that you have downloaded before or that someone has sent you. Errors may occur when uploading them.
-
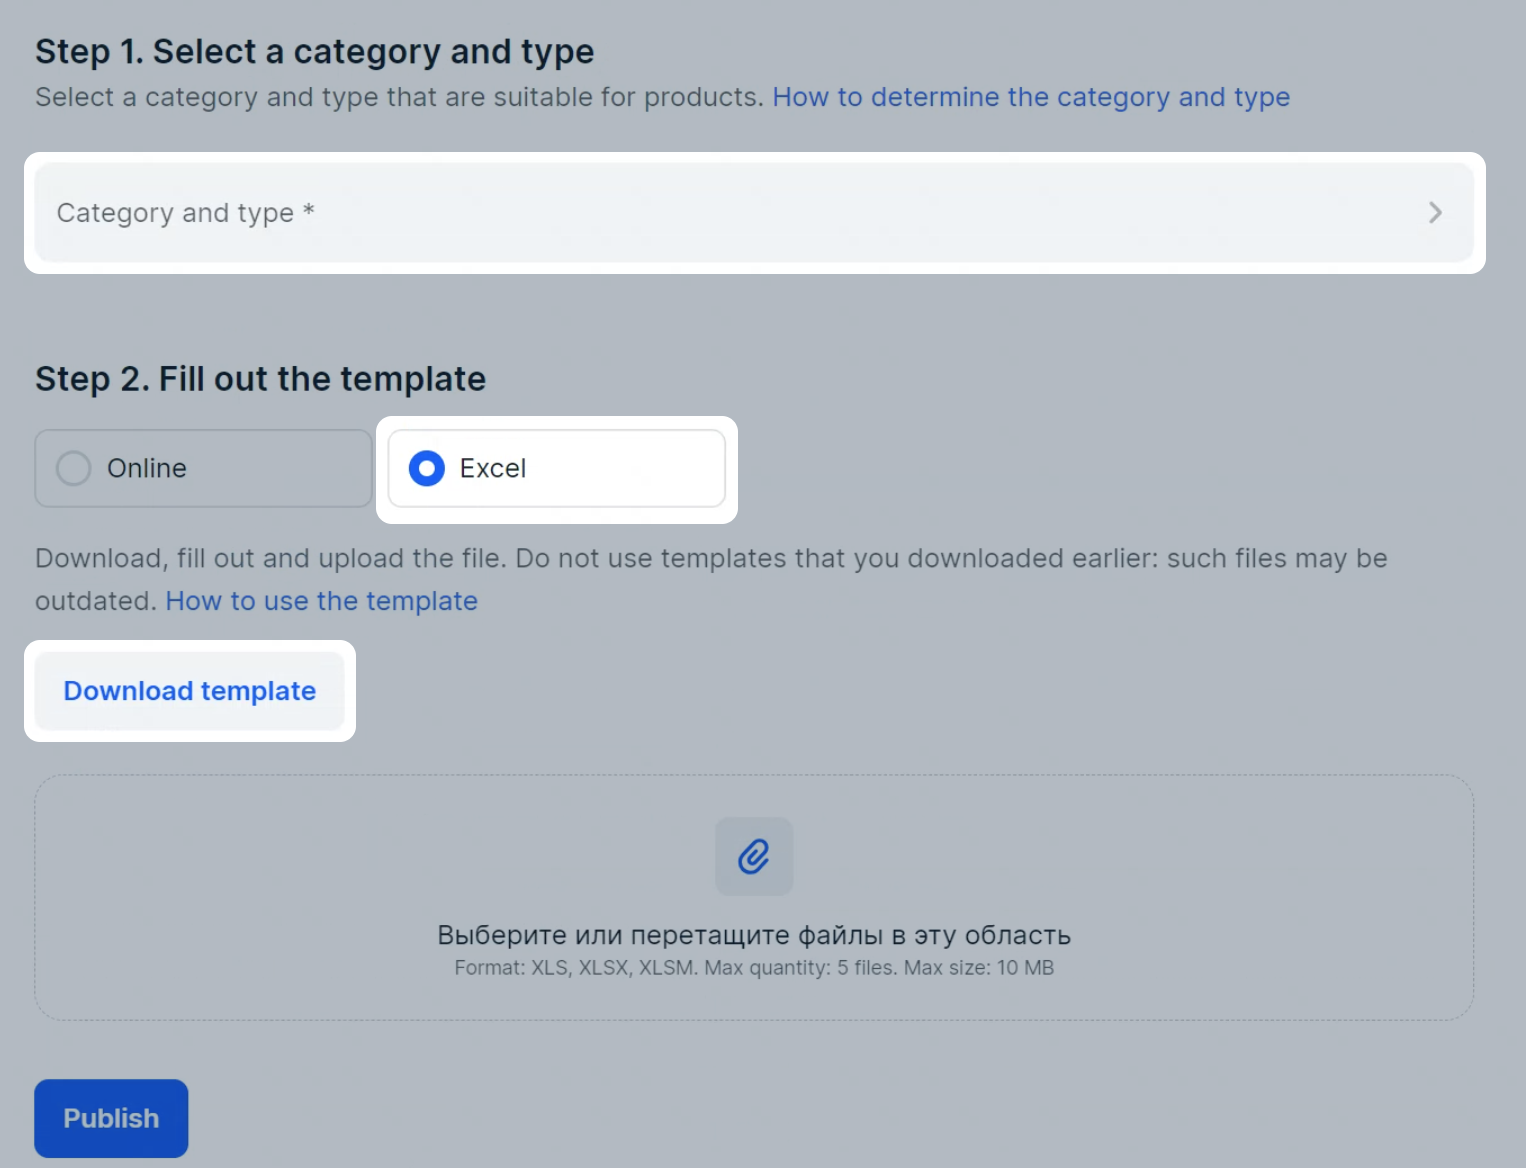
Go to Products and prices → Add products → Via template section.
-
Choose a category and download a template for it. If the product can be assigned to more than one category, select one priority category.
If you can’t find the right category, message us or click
 at the bottom of your profile and select Create a request
→ Content / Work with the product card → Incorrect product category.
at the bottom of your profile and select Create a request
→ Content / Work with the product card → Incorrect product category. -
Fill in the template, specifying all the main characteristics. The description and images must comply with the requirements.
If you don’t want to upload main images via links, you can leave the Link to main photo column empty in the template. You can add images later for all products at once.When uploading products in the Fur coats, Footwear, Clothing, Cameras and flash lamps, Tires, Light industry goods, Perfumes and eau de toilette categories, in the OKPD/FEACN code field specify the FEACN or OKPD2 code for each product.
If you don’t know which category your product belongs to, and it isn’t a banned product, select “FEACN 29.09.20.20 - CROSSBORDER PRODUCTS” or “2812 - Crossborder Products”.
It’s better to choose the OKPD/FEACN code that matches your product. -
Go back to your profile and upload the filled in file in the Products and prices → Add products → Via template section.
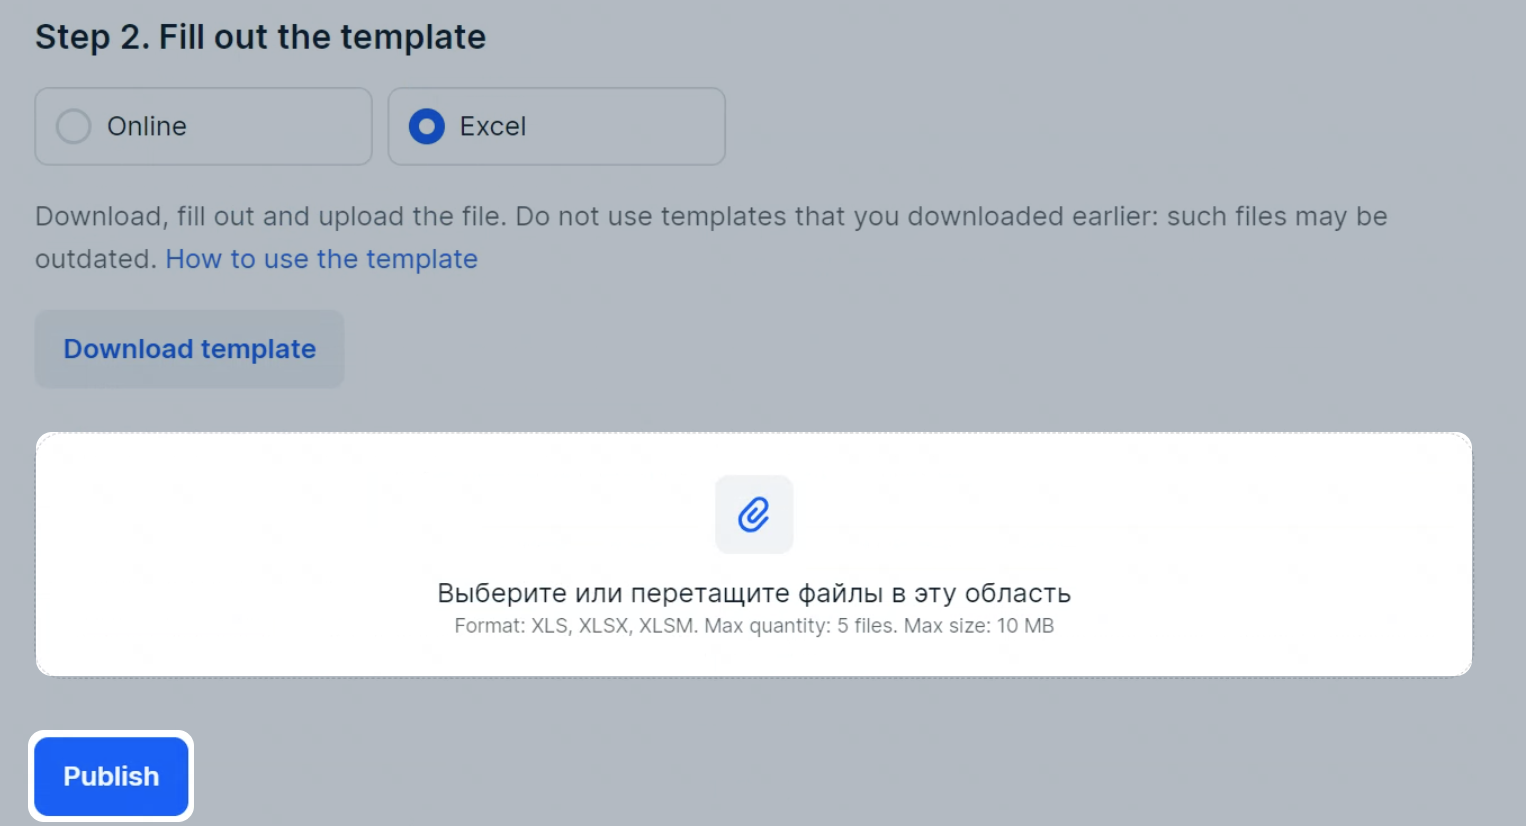
The system will check the correctness of all data you entered. You can find check results in the Products and prices → Update history section. The table shows the status of the check and the number of products with errors.
To find out what kind of problems occurred, click
![]() in the Actions column and select Learn more.
in the Actions column and select Learn more.
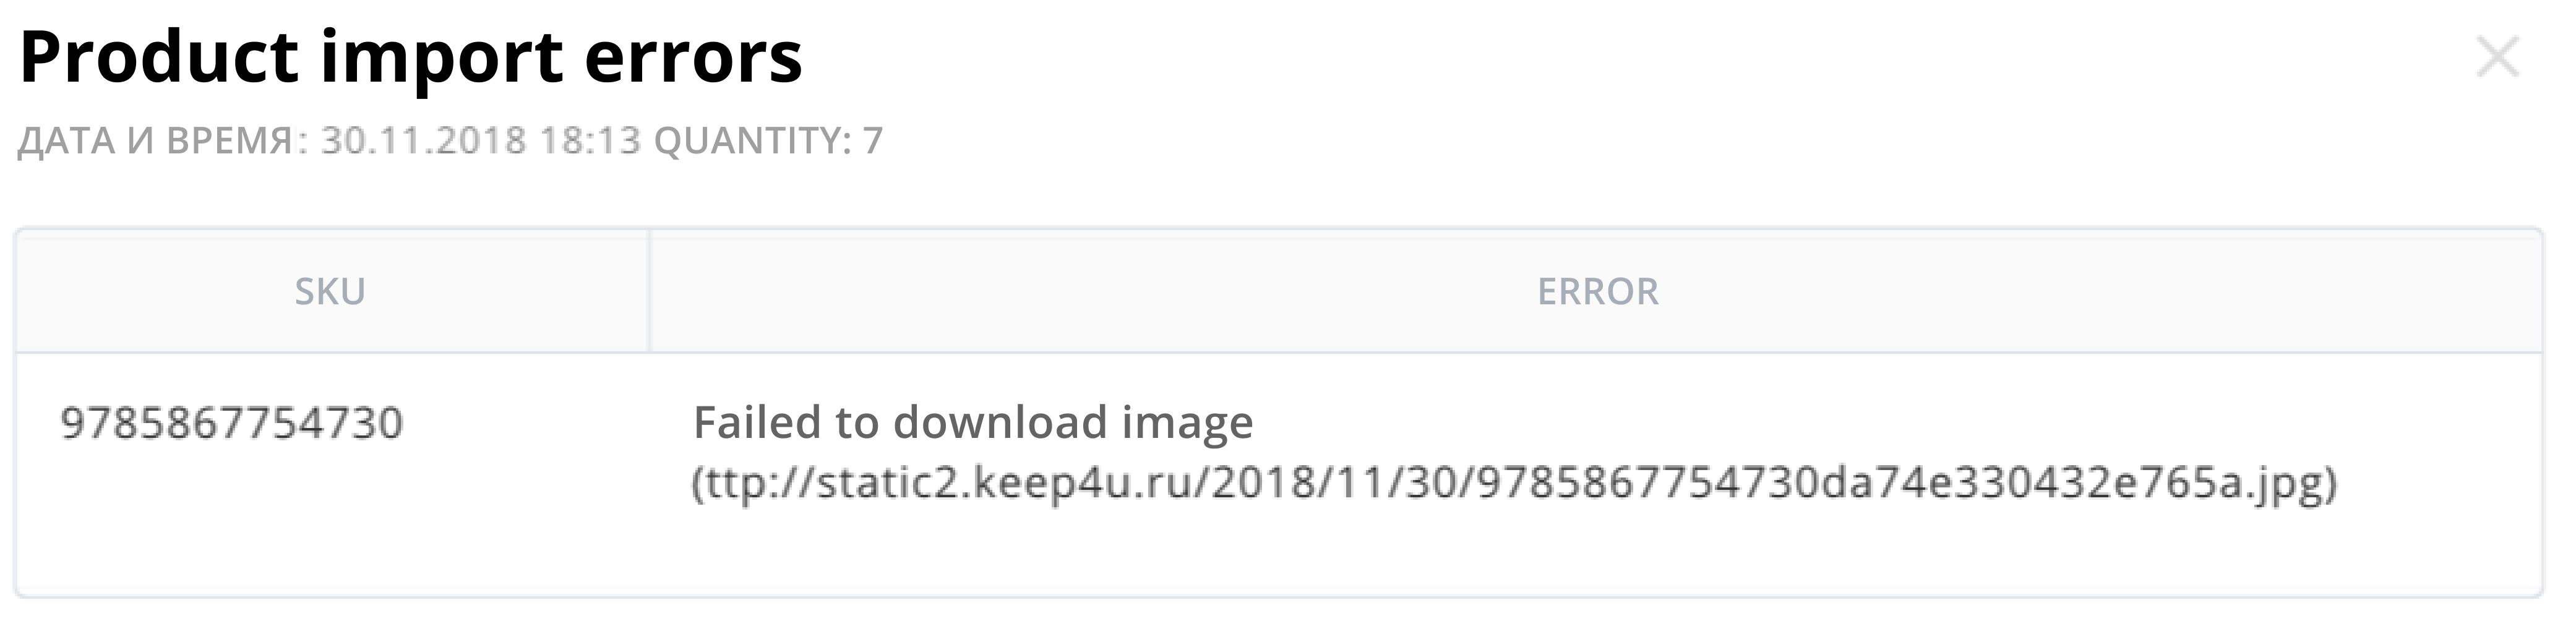
If there are many errors, fix them in the XLS-file and upload it again. Errors in individual products can be edited manually on the Products and prices → Manage Inventory page.
Working with a template #
1. Download templates in your profile #
Before each upload, download a new template in your profile. We regularly update templates to keep them as accurate and convenient as possible. Don’t use templates that you have downloaded before or that someone has sent you.
Don’t change the file structure
Don’t add or remove sheets or columns. Don’t change the order of columns or hide them.
2. Fill in the rows correctly #
Use a separate row for each article code. For example:
| Article code | Name | Size | |
|---|---|---|---|
| 1 | R17 | Romance ring | 17 |
| 2 | R18 | Romance ring | 18 |
You can fill only some blocks from the file:
-
Specify the Ozon ID. The system will use it to find the product and add it to your catalog.
How to find out the Ozon ID -
Fill in all the blocks if the product isn’t yet on Ozon. Specify as many characteristics as possible. They are used when searching and filtering by parameters. The more details you provide about a product, the more often customers will find it. On top of that, products with detailed characteristics appear more attractive to customers.
-
Fill in the fields highlighted in red; they are mandatory.
-
Use the tooltips. There is a tooltip above each field on how to properly fill it in. Make sure you read it. If the tooltip isn’t fully visible, you can stretch the row.
3. Don’t change the value type #
There are several types of fields in the templates. Don’t change them and make sure you fill them in correctly:
-
Drop-down list. When you click on a cell, an arrow icon
 will appear next to it.
This tooltip means “Choose a value from the list.” Click on the arrow and select the appropriate value. Don’t enter the
value manually.
will appear next to it.
This tooltip means “Choose a value from the list.” Click on the arrow and select the appropriate value. Don’t enter the
value manually.Examples: type, VAT.
To select multiple values from the list:
-
Click on the arrow and check the available values. For example, the Color field has the following values: white, blue, green.
-
In any empty cell, write all the values you need, separated by a semicolon without spaces. The values must be spelled exactly as they are in the drop-down list. For example: white;blue;green.
-
Copy the line with the values and paste it into the parameter field.
-
-
Number. When you click on the cell, an “Enter a value from 0 to 9999” tooltip will appear next to it. This information may also appear in a tooltip above the field. Enter only numbers without units in such fields.
Examples: weight, width, price.
-
Text. In such fields, you can write any information you need for the parameter.
Examples: product name, brand, detailed description.
Some templates have several sheets:
-
Instructions and Certificates: provide only direct links to certificates and other documents for the product as PDF files. Don’t attach links to cloud storage websites or archives.
-
Videos: on this sheet, you can enter links to videos about products.
-
Sheets with product features: on these sheets, you can specify additional parameters. Such sheets are available, for example, in templates for electronics or cosmetics.
Fill them all in.
4. Check that there are no links to other files #
To learn how to find and remove links (external links), check Microsoft Help.
Filling in the template #
Fill in the following fields:
Name and prices #
-
Article code.
Article code in your database. Article code must be unique for each product. For example, a notebook with a red cover and a similar notebook with a blue cover are different products. Add another separate product with a new article code.
If you have repeating article codes in your product base, make them unique. You can add product colors, sizes, or simply “_1”, “_2”, “_3” to the existing article codes.
Example:
No. Article code* Product name* 1 DSPSWW_red HATBER Notebook “Color” 2 DSPSWW_blue HATBER Notebook “Color” -
Product name. The name is formed via one of the methods:
-
Compiled automatically from the mandatory characteristics, by default for all categories. The name is formed by this pattern: type + brand + model + important characteristics for the category. For the name to be compiled automatically, leave the “Name” field empty.
-
Manually set. Specify the name to be shown on the PDP yourself. These names are subject to moderation and must meet the requirements.
-
-
Price and VAT, %. Set the price. In the VAT field, choose Not subject to. You can enter additional prices:
- The price before discounts (the old price) at which the product was sold earlier. Customers will see the old price crossed out and the discount percentage. The old price must be higher than the current price.
- Special price for Ozon Premium subscribers. Learn more about special prices
Product information #
Barcode (Serial Number / EAN) is the code by which the product is accepted in the warehouse. The field is mandatory if you work under the FBO scheme. The barcode is generated in your personal account or provided by the manufacturer. If there are multiple barcodes, specify all of them separated by semicolons.
You can add a barcode when creating a product or when placing a supply request.
Advanced product information #
-
Package weight, g, package width, mm, package height, mm, package length, mm. Enter the weight and dimensions of the packaged product. The length should be the biggest of the dimensions, the height is the smallest. There are maximum and minimum values for each product category. The weight and dimensions of the packaged product must fall within the allowed value range. You can’t add a product whose weight and dimensions don’t comply. You can specify dimensions of the product without packaging in the Characteristics block.
-
Link to main photo. Enter a direct link to the main image. Such links end in the following characters: .jpeg, .jpeg, .jpg, .png.
Learn more about getting direct links to images
Characteristics #
Fill in the characteristics that will appear on the PDP. To make the product more attractive to customers, specify as many characteristics as possible. If you want to merge products on a single PDP, fill in the fields highlighted in yellow. This will allow the customer to switch between product variants on the PDP.
Learn more about merging products on a single PDP
If you plan to sell:
-
Several units in one product, e.g., three bars of soap in a single package, then, when uploading your products, enter the desired number of units, for example, “3”, in the Units per product field.
-
Singular products, enter “1” in the Units per product field.
-
Related products, such as smartphone accessories or car replacement parts: fill in the Для чего подходит (What it is suitable for) field.
Learn more about filling in a PDP for selling accessories and replacement parts
Learn more about errors that may occur when working with products