All images are subject to moderation, so consider the
requirements.
Via PDP
#
Add a photo
#
To start selling products, add a photo. If you add a product in the “Clothing”, “Shoes”, or “Haberdashery & Accessories” categories, you can create a PDP first and upload a photo later.
How to add a product without a photo
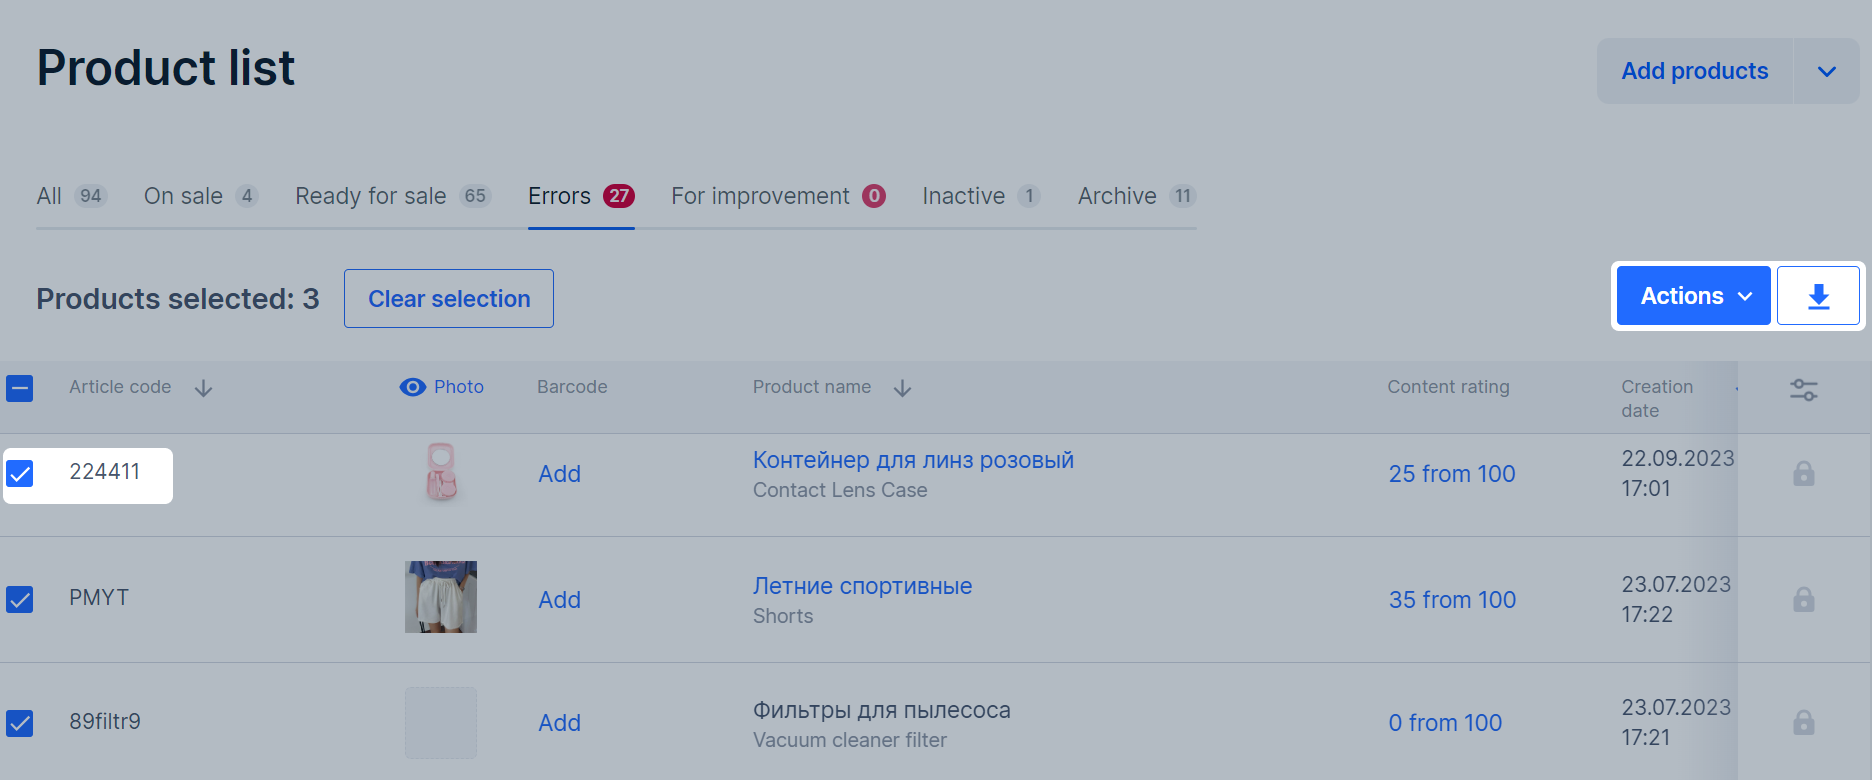
In other categories, PDPs without images won’t qualify for sale. You can view a list of them in the Products and prices → Product list → Errors section.
Learn more about photo requirements
-
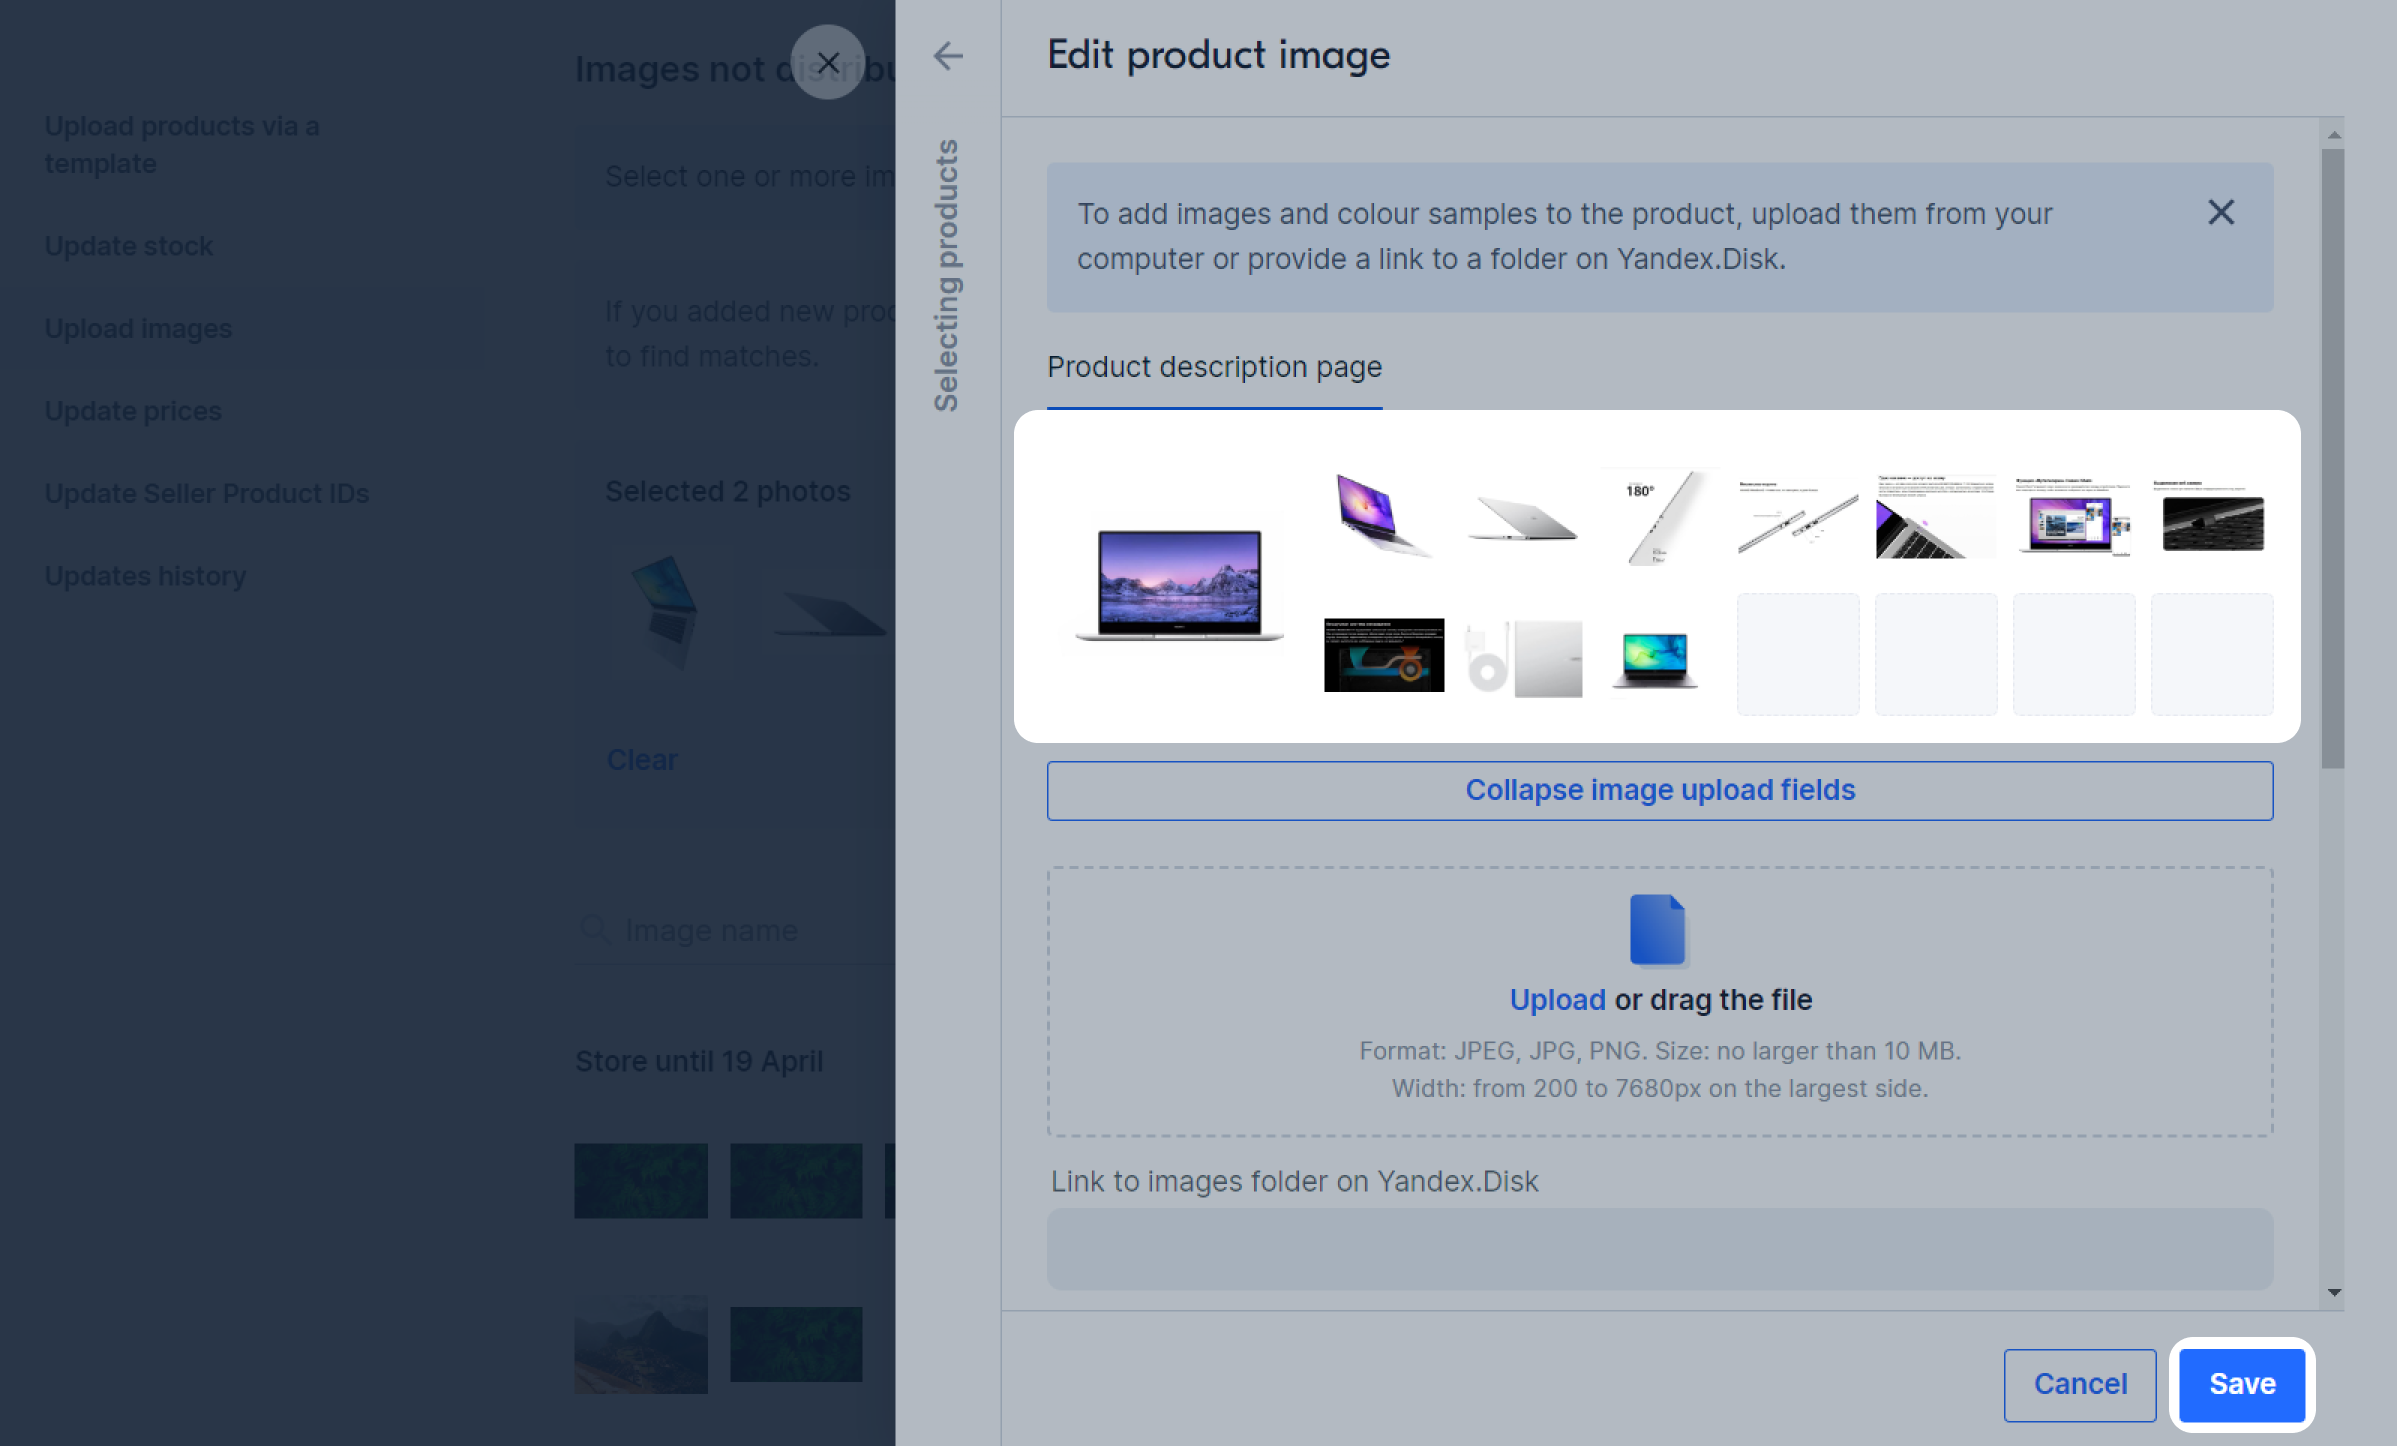
Fill in the product characteristics and go to the Media tab. In the Images section click Add.
-
Upload photo using one of the following ways:
- Drag and drop the image to the upload area.
- Click
 and add files from the computer.
- Specify link to the folder with the photo on Yandex.Disk. The folder should contain only images. Other files and subfolders aren't recognized.
How to get a direct link
If Yandex.Disk isn’t available in your region, use alternative upload methods.
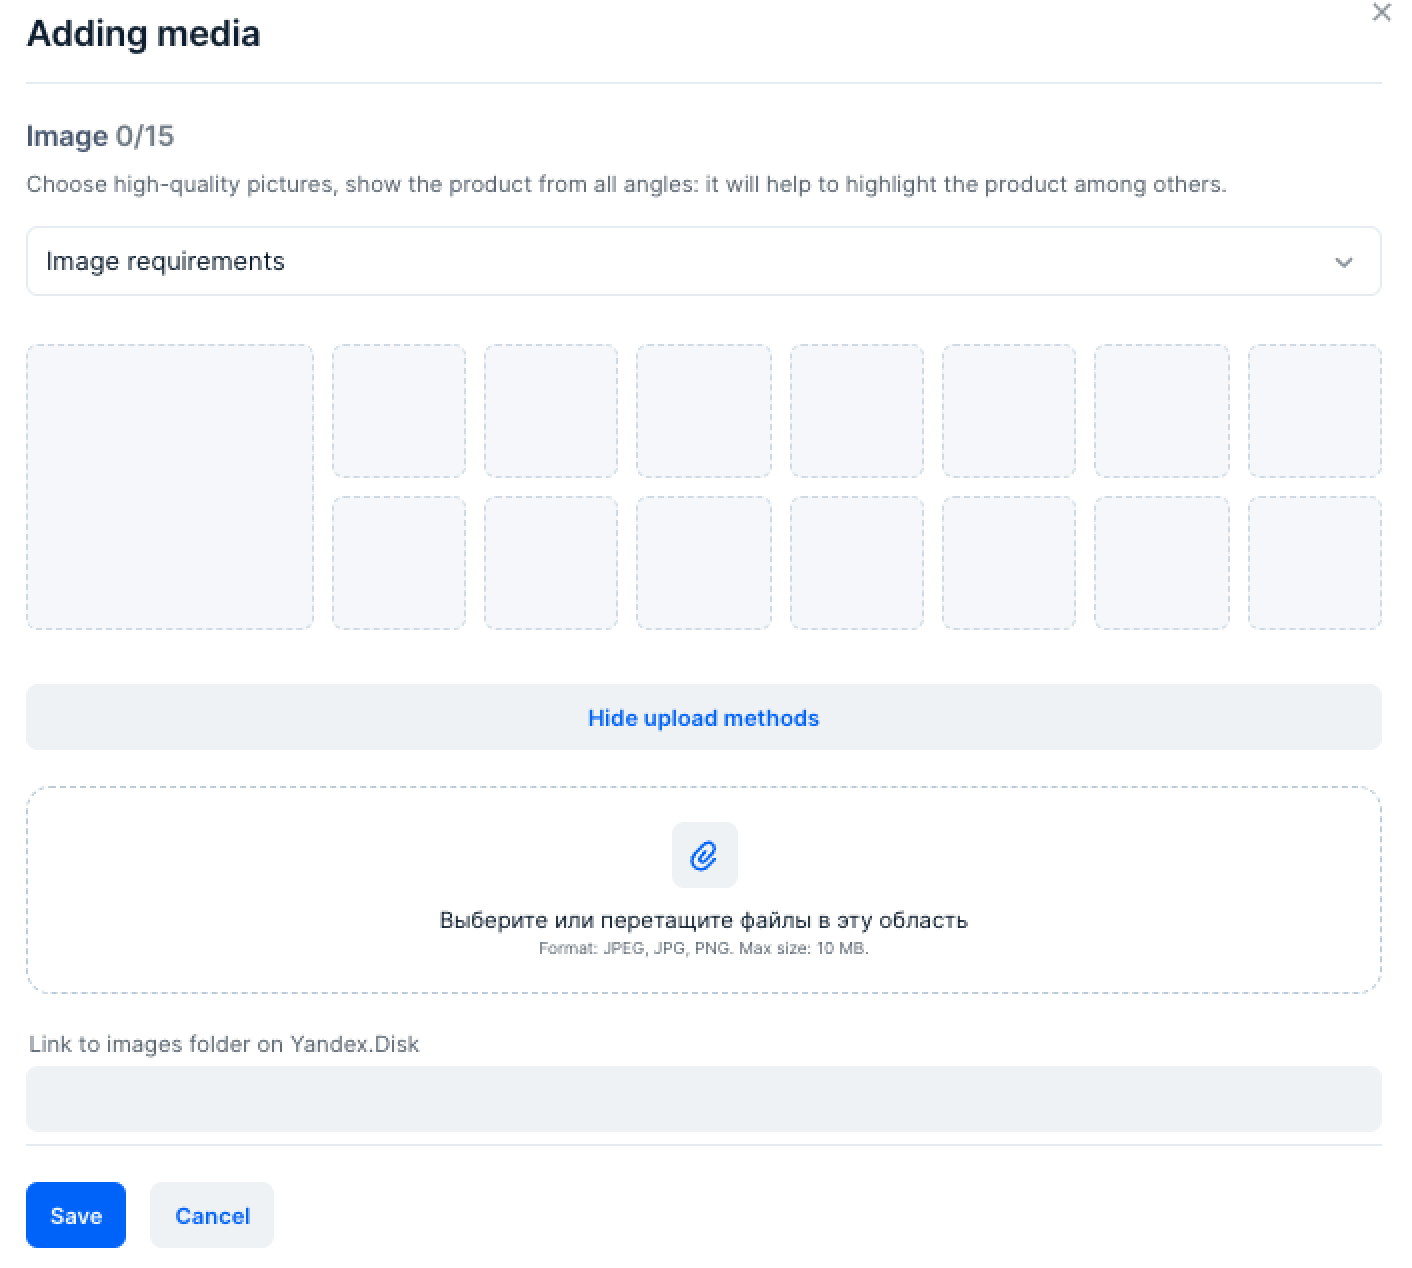
You can upload no more than 15 photos: 1 main and 14 additional. If you upload more, the extra photos will appear in the Other images of this product block.
To add them to PDP, delete any image from it.
To set the main photo, place it first in the list of images in the Main photo window. Image with errors
will be highlighted in red. Hover the cursor over it to see the hint.
-
Click Save. Fill in the remaining product characteristics.
If everything is fine with the PDP, the product will appear in the Products and prices → Product list → Ready for sale section.
You can find products with errors on the Errors, For improvement tabs.
-
Go to Products and prices → Product list section,
click
 in the appropriate row and select Edit media.
-
Add images in one of the ways:
- Drag and drop the photo to the upload area;
- Click
and add files from the computer;
- Specify link to the folder with the photo on Yandex.Disk. The folder should contain only photos. Other files and subfolders aren't recognized.
If Yandex.Disk isn’t available in your region, use alternative upload methods.
You can upload no more than 15 photos: 1 main and 14 additional. If you upload more, the extra photos will appear in the Other images of this product block.
To add them to PDP, delete any image from it.
To set the main photo, place it first in the list of images in the Main photo window. Image with errors
will be highlighted in red. Hover the cursor over it to see the hint.
-
Click Save.
If everything is fine with the PDP, the product will appear in the Products and prices → Product list → Ready for sale section. You can find products with errors on the Errors, For improvement tabs.
Add products without photos
#
If you add a product in the “Clothing & Accessories”, “Shoes”, or “Haberdashery & Jewelry” categories, you can create a PDP first and upload a photo later. For example, this may be a case if you need to stock a new collection and the product photos are not made yet.
To get the product on sale:
- Create PDPs without photos. They will be displayed on the “Ready for sale” and “For improvement” tabs on the product list.
- Specify the stocks amount or create a supply.
- Upload photos once you get them. To get a list of products without photos, use the “Only products without photos” filter.
After the product with an added photo passes moderation, the product will get on sale.
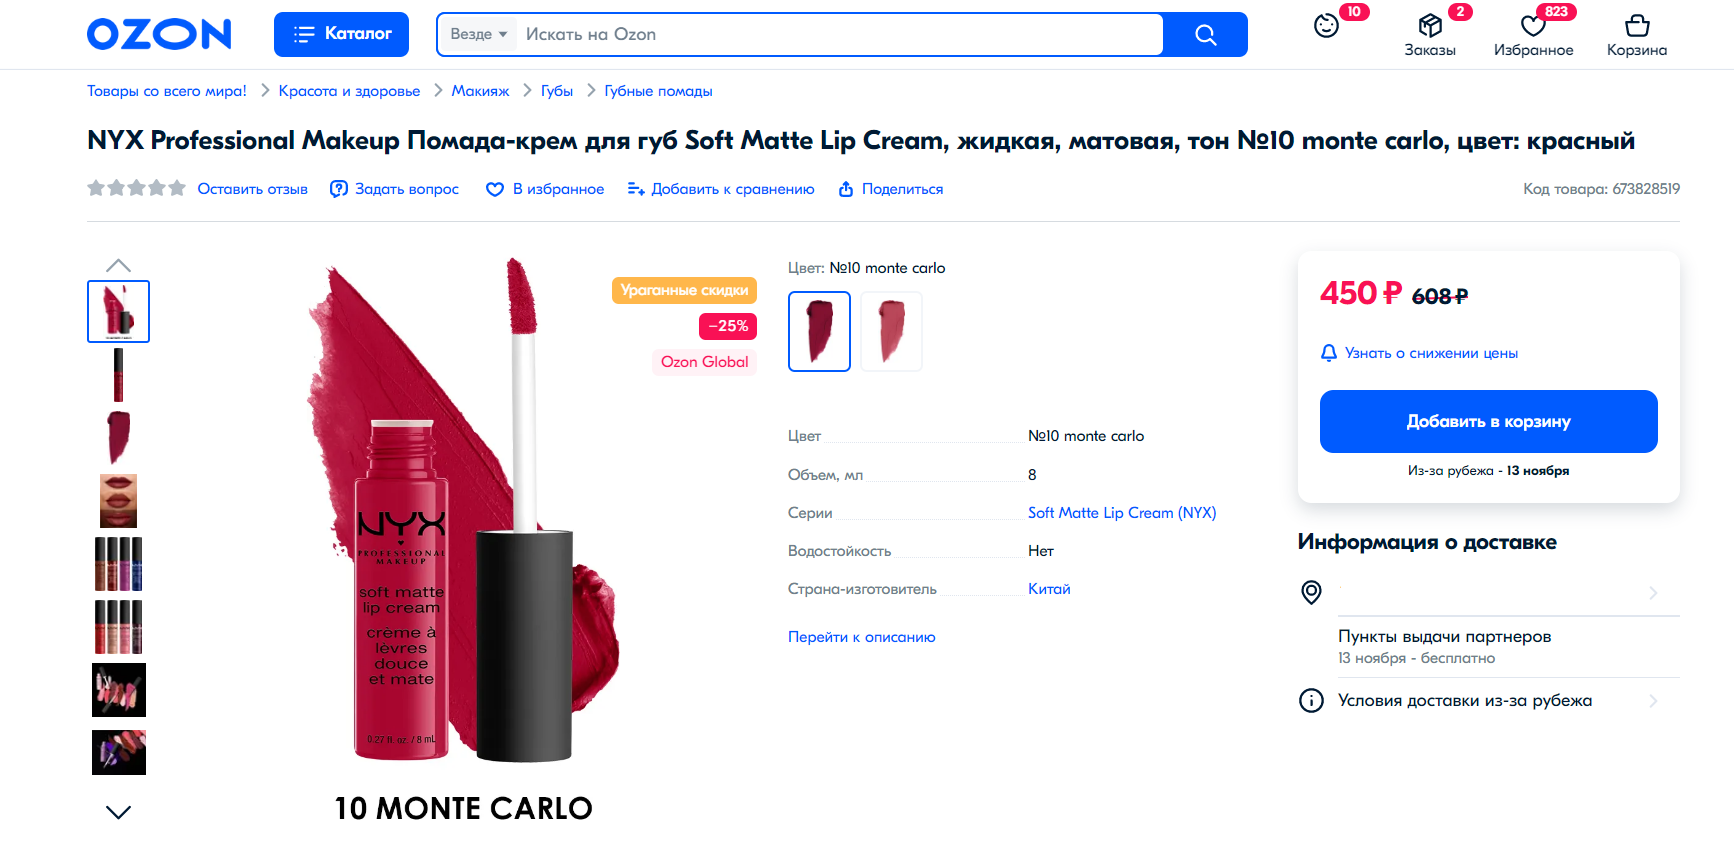
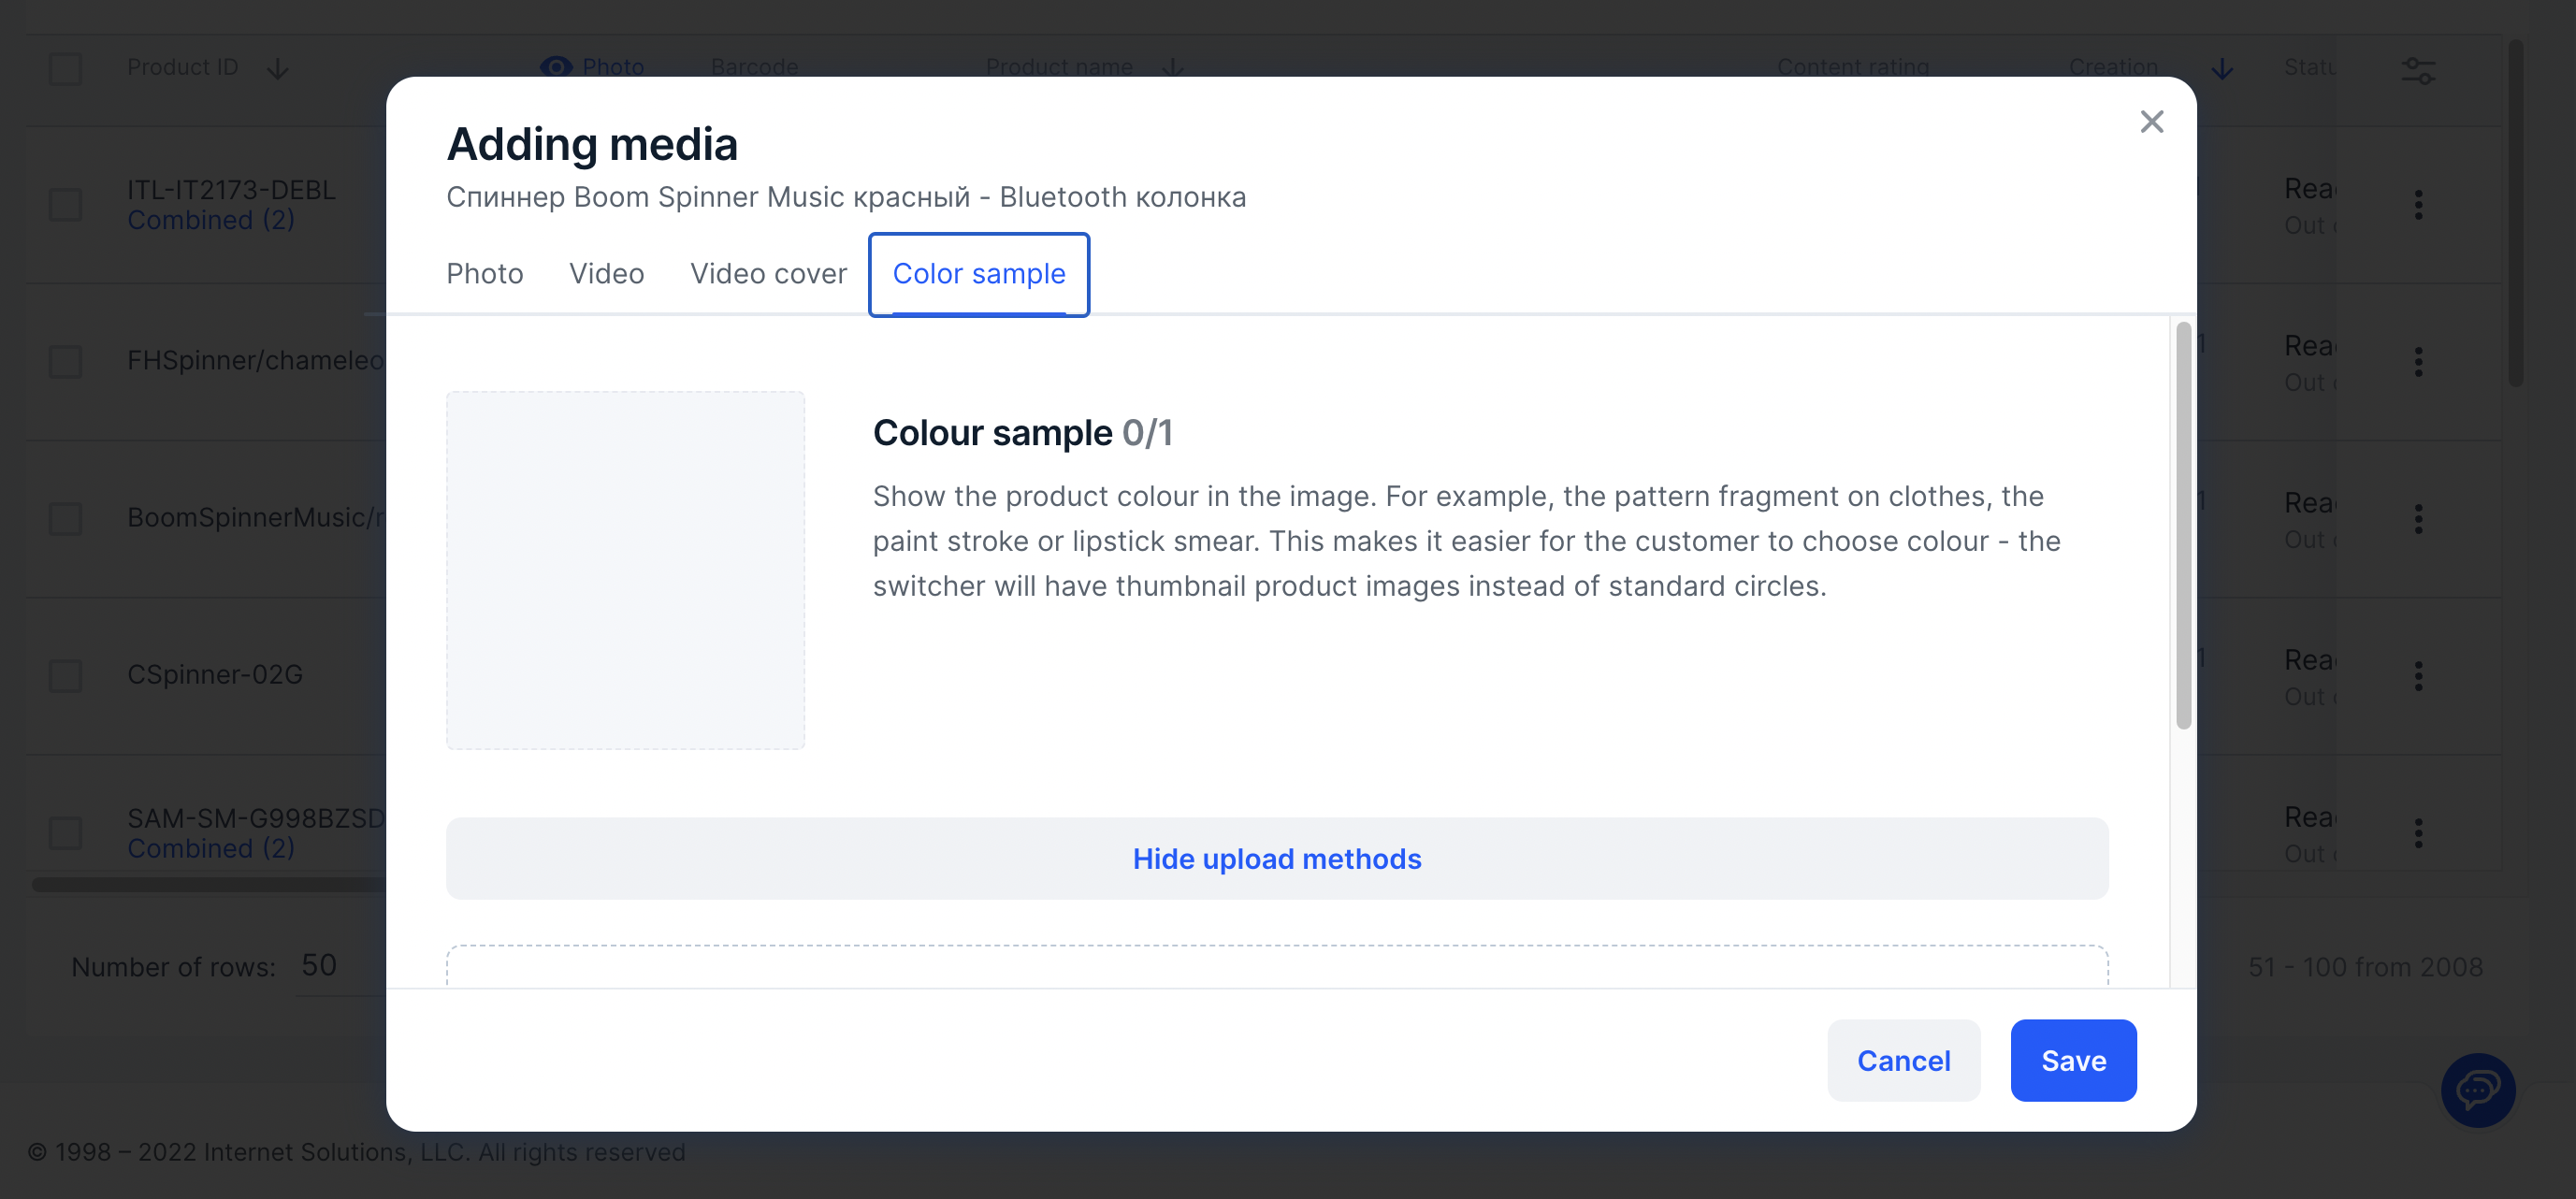
Add color sample
#
You can add color sample not for all categories.
If the product is available in multiple shades, upload color sample images to PDPs. Then the site
will have miniature images instead of standard circles in the color switcher. For example, a fragment of
a drawing on a product, a dab of paint or lipstick.
A color sample can be one for each product.
-
Fill in the product characteristics and go to the Media tab. In the Color sample section click Add.
-
Add images in one of the following ways:
- Drag and drop the image to the upload area.
- Click
 and add files from the computer.
- Specify link to the folder with the photo on Yandex.Disk. The folder should contain only images. Other files and subfolders aren't recognized.
If Yandex.Disk isn’t available in your region, use alternative upload methods.
-
Click Save. Fill in the remaining product characteristics.
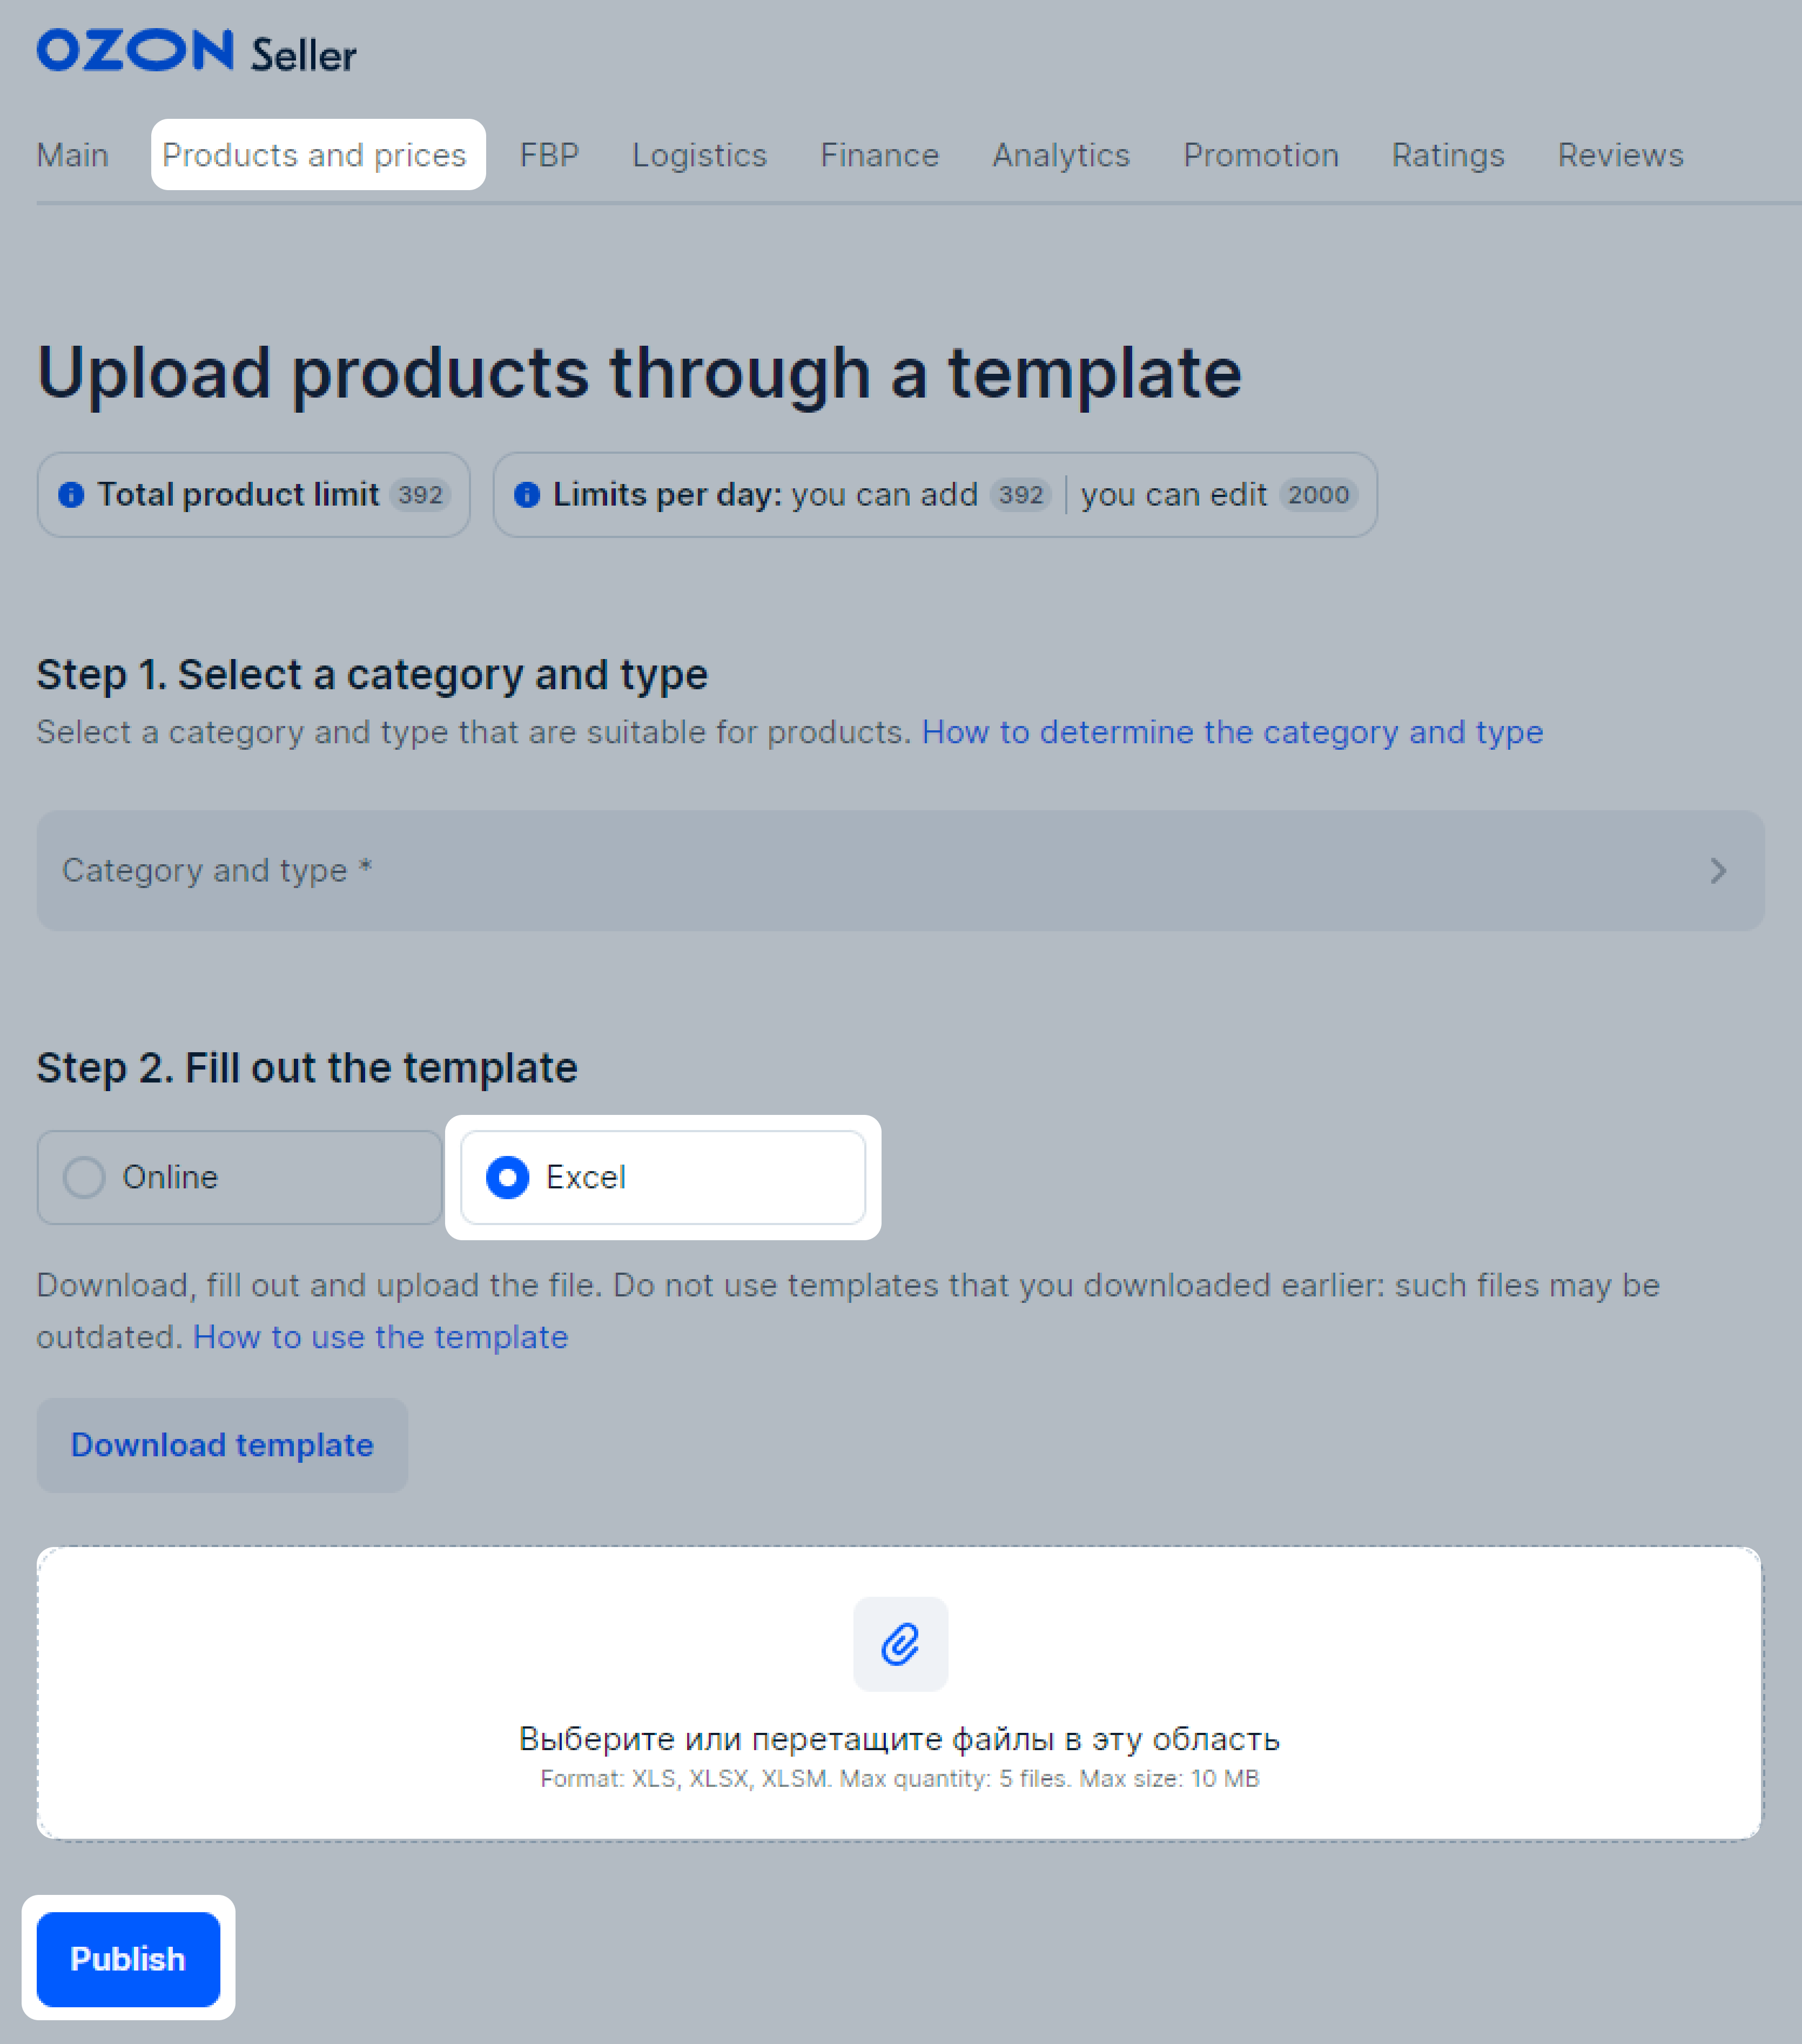
Via XLS template
#
Add a photo
#
- Download an XLS file with a template or online table.
- On the Upload products via a template tab, fill in the Link to the main photo field. You can
add only one link.
Requirements for images and their links
- In the Links to additional photos field, enter the addresses separated by commas or enter each
one from a new line.
- Upload the XLS file or save the online table and wait for moderation.
If you don’t specify a link to the main photo, it’ll be selected from the additional ones, and the
product will be moved to the Products and prices → Product list → For improvement tab.
- Download an XLS file with a template.
- On the Supplier template tab, fill in the Main photo link field. You can add only one link.
Requirements for images and their links
- In the Links to additional photos field, specify the addresses separated by commas, or specify each on a new row.
- Upload the XLS file and wait for moderation to pass.
If you don’t specify a link to the main photo, it’ll be selected from the additional ones, and the product will be moved to the Products and prices → Product list → For improvement tab.
Replace photo
#
-
Go to the Products and prices → Product list tab.
-
Select the products for which you want to edit the photo.
-
Click Actions and select Download template.
-
Click the download icon.
-
In the Download manager window, find the file you need and download it. The template is formed for
each request and is available in your personal account for 2 days.
-
Edit photo list: add new ones, replace or delete old links.
-
Go to the Products and prices → Add products → Via template section. In the Fill out the template step select Excel, add new template and click Publish.
If the product has errors, download the errors report in the Products → Update history section. The report contains links to photos that you added when uploading the product.
You can also find a product with an error in the photo in the product list on the
Errors and For improvement tabs.
Add and replace photo 360
#
- Download an XLS file with a template or online table.
- On the Upload products via a template tab, in the Links to photo 360 field, add a
link to the folder with images or links to each photo separately in the desired order.
Add from 36 to 70 images. We recommend uploading images from file sharing sites, for example,
Yandex.Disk. Don’t use Dropbox and Google Drive services.
- Upload the XLS file or save the online table. Wait for moderation to pass.
- Upload the XLS file. Wait for moderation to pass.
Via API
#
Ozon Seller API is a software interface for working with the Ozon marketplace. It makes it possible to
automatically exchange a large amount of information between your system and the platform.
How to work with API
How to add images via API
Add photos to multiple products at once
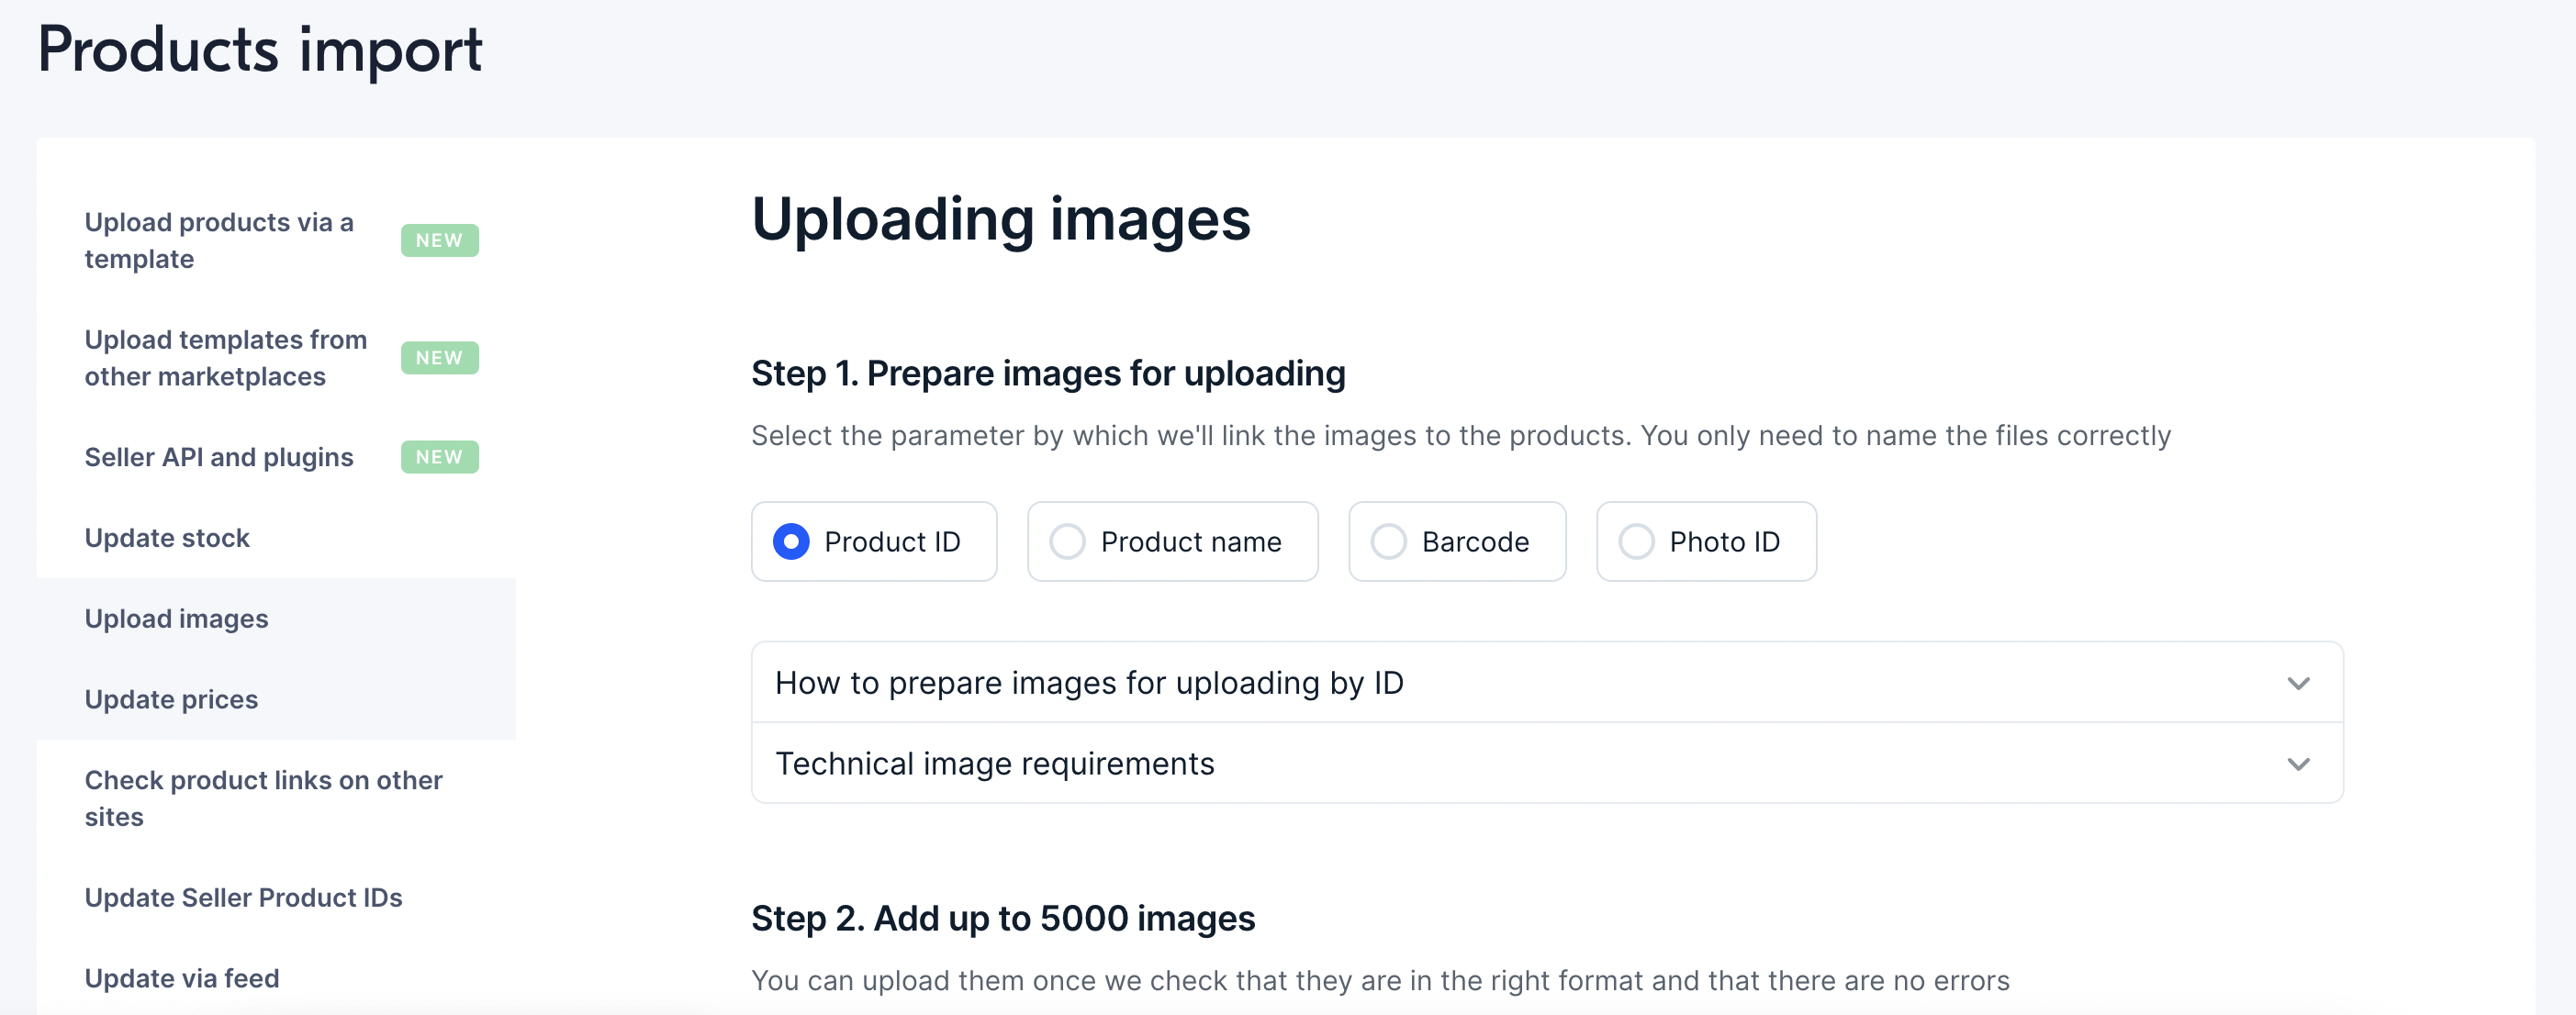
#
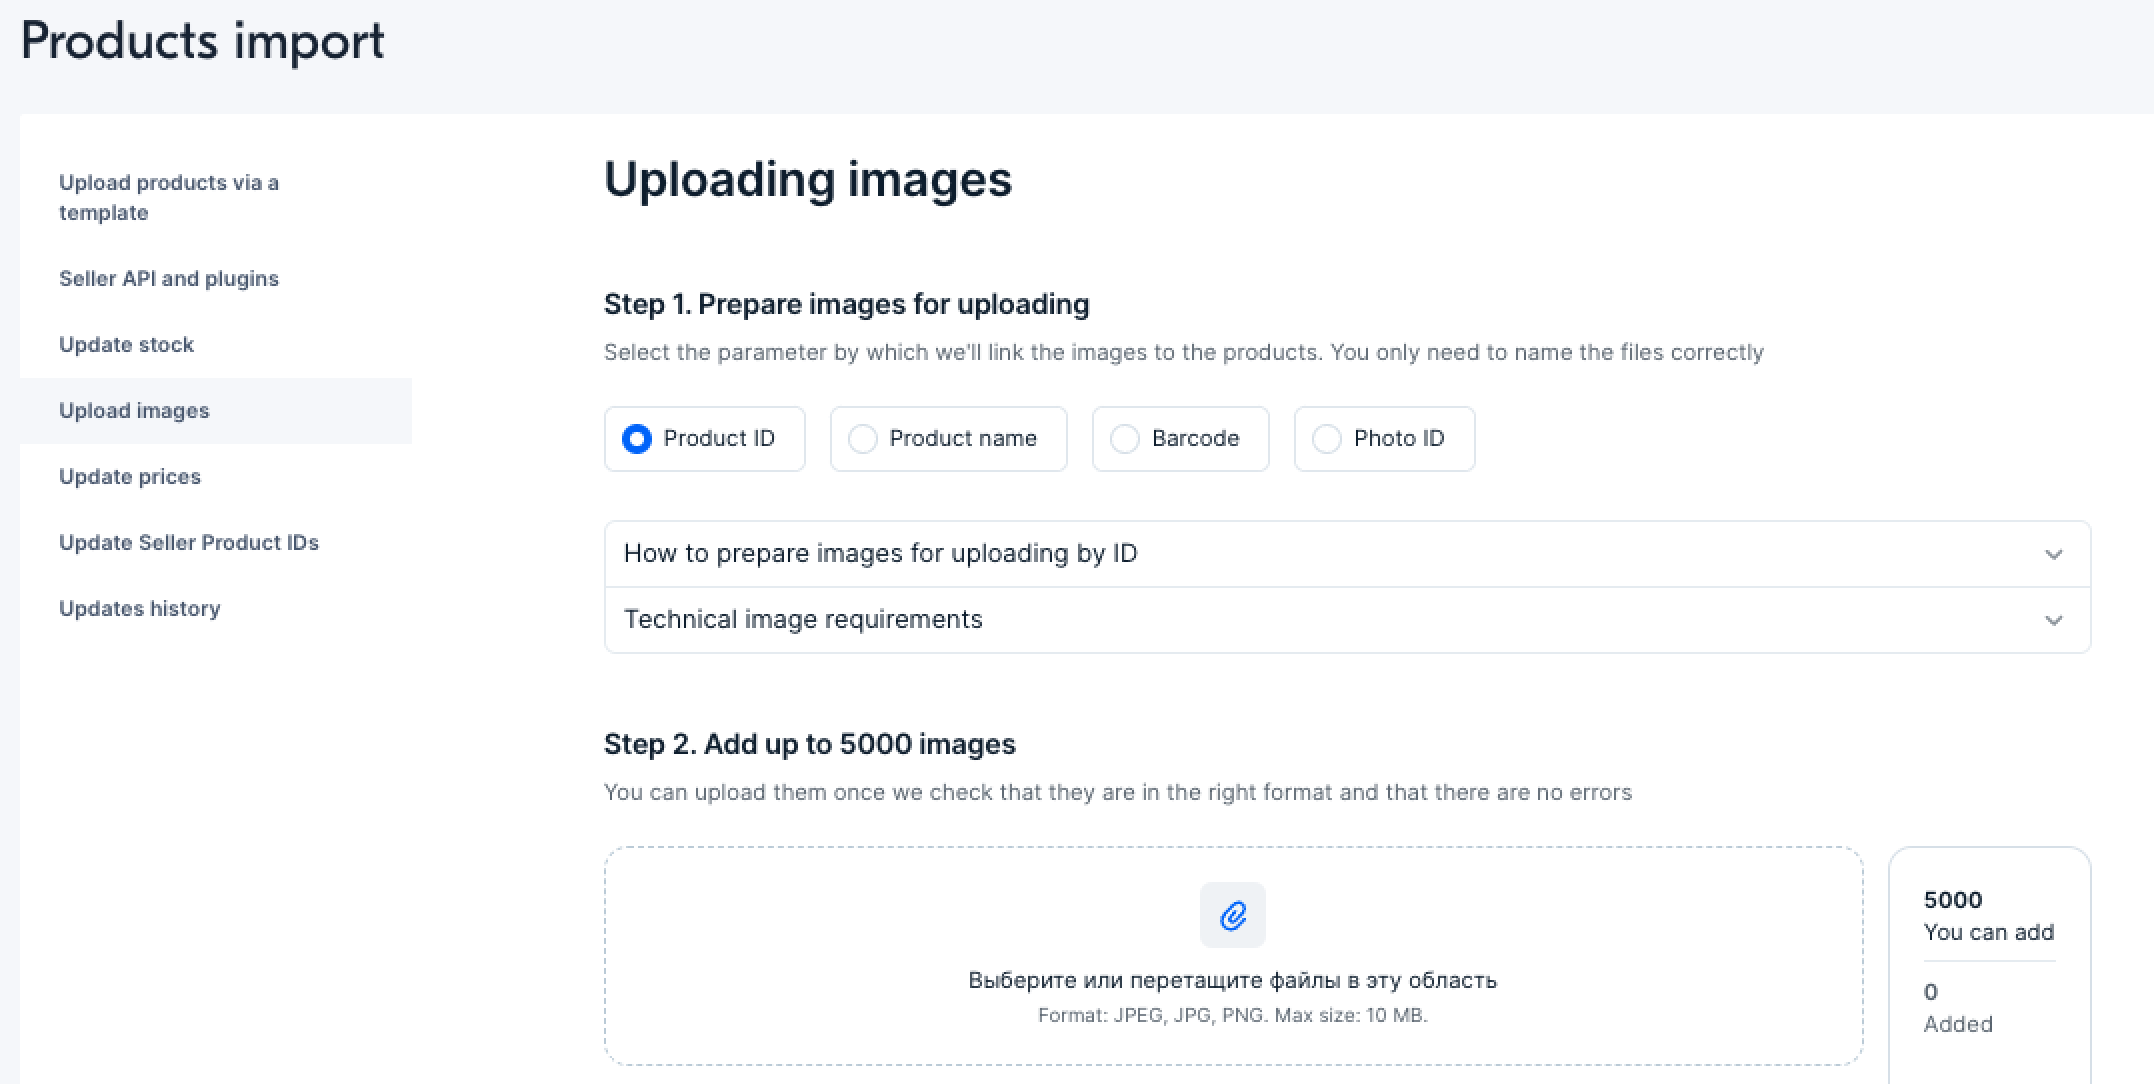
In the Products and prices → Upload images section you can add up to 5000 images at a time in JPEG, JPG, PNG, HEIC, or WEBPB formats.
They will be linked to products automatically:
- by article code, barcode, or name: use it to add multiple photos to one PDP,
- by photo ID: use it to upload one photo for different products.
If you upload photos in bulk, we can only update 1000 products at a time. We’ll choose them randomly.
- Rename the photo that you want to link to products: specify article code, barcode, or name.
For example, if the article code is “123white”, name the photo “123white.jpg”. To upload multiple photos for products,
add an underscore and a sequence number starting from 2: “123white_2.jpg”, “123white_3.jpg” in the image name.
- Go to the Products and prices → Upload images.
- Select the parameter by which you want to link images to products: Article code, Barcode, or Product name.
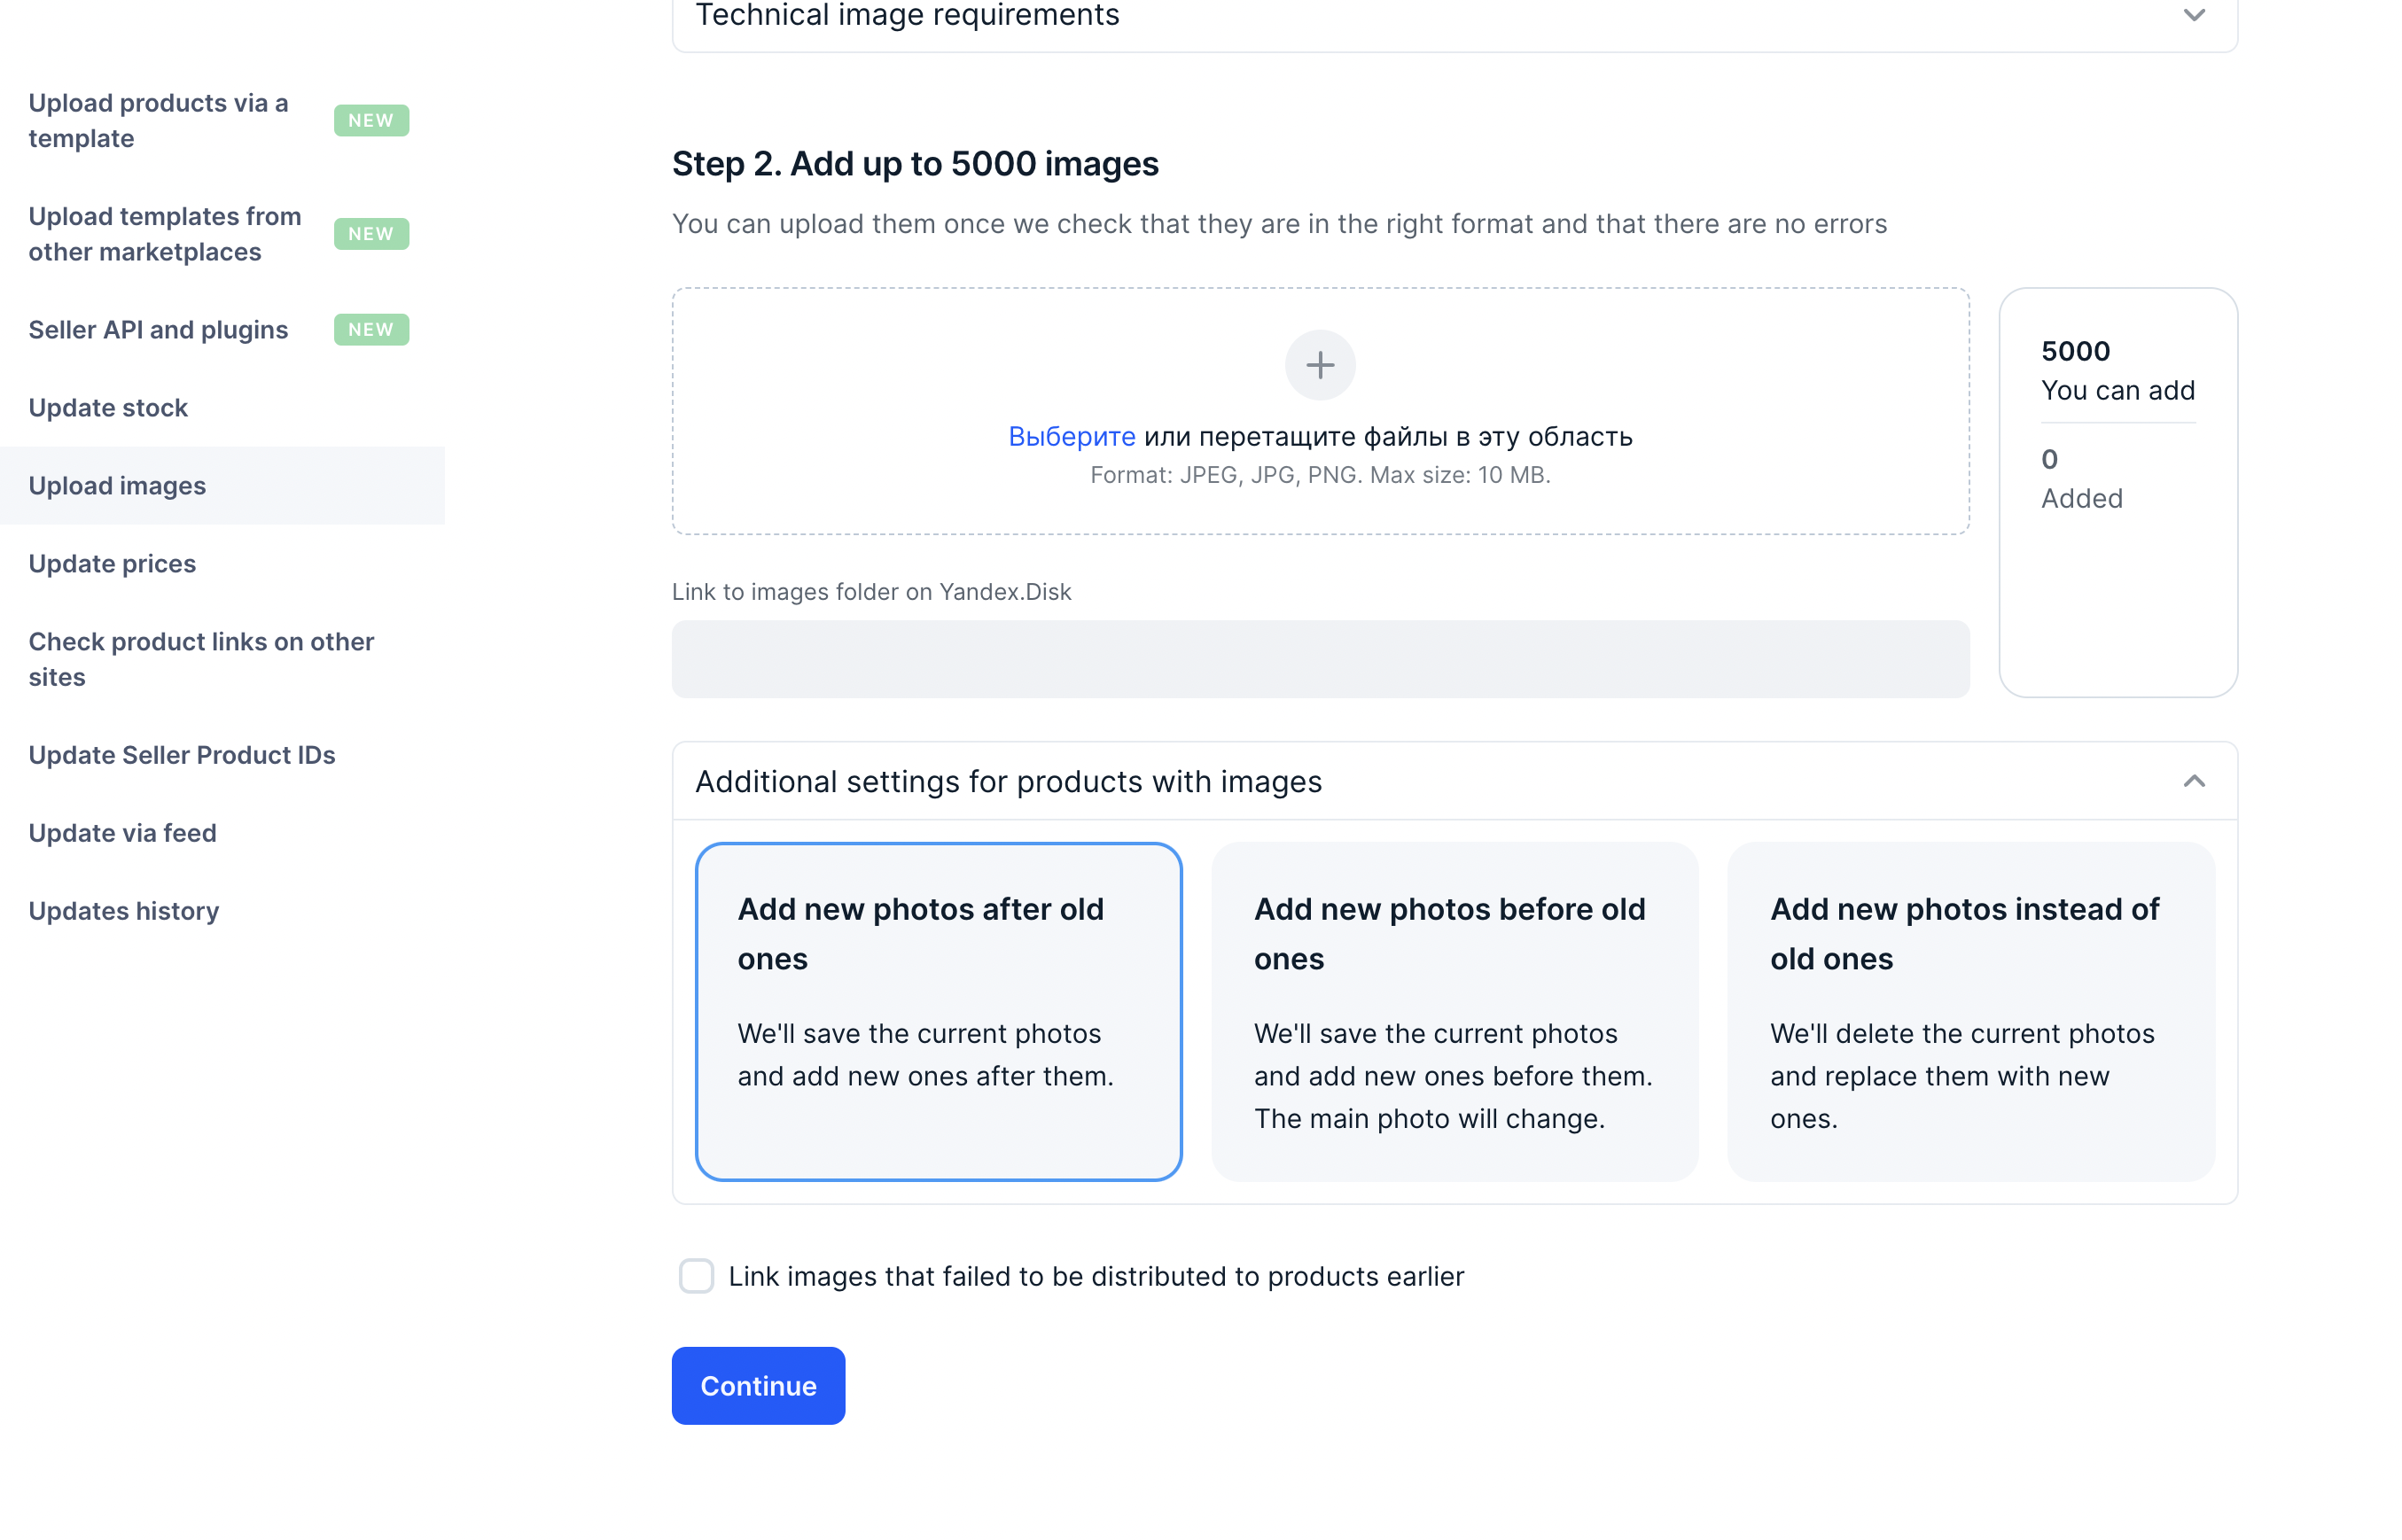
- Upload images. On the right you’ll see how much is uploaded and left and if there are errors.
-
If the products you are adding photos to already have images, open Advanced settings for products with photos and choose what to do with the current photos in the PDP:
- add new ones after old ones;
- add new ones to old ones;
- replace the current images with new ones.
Click Continue.
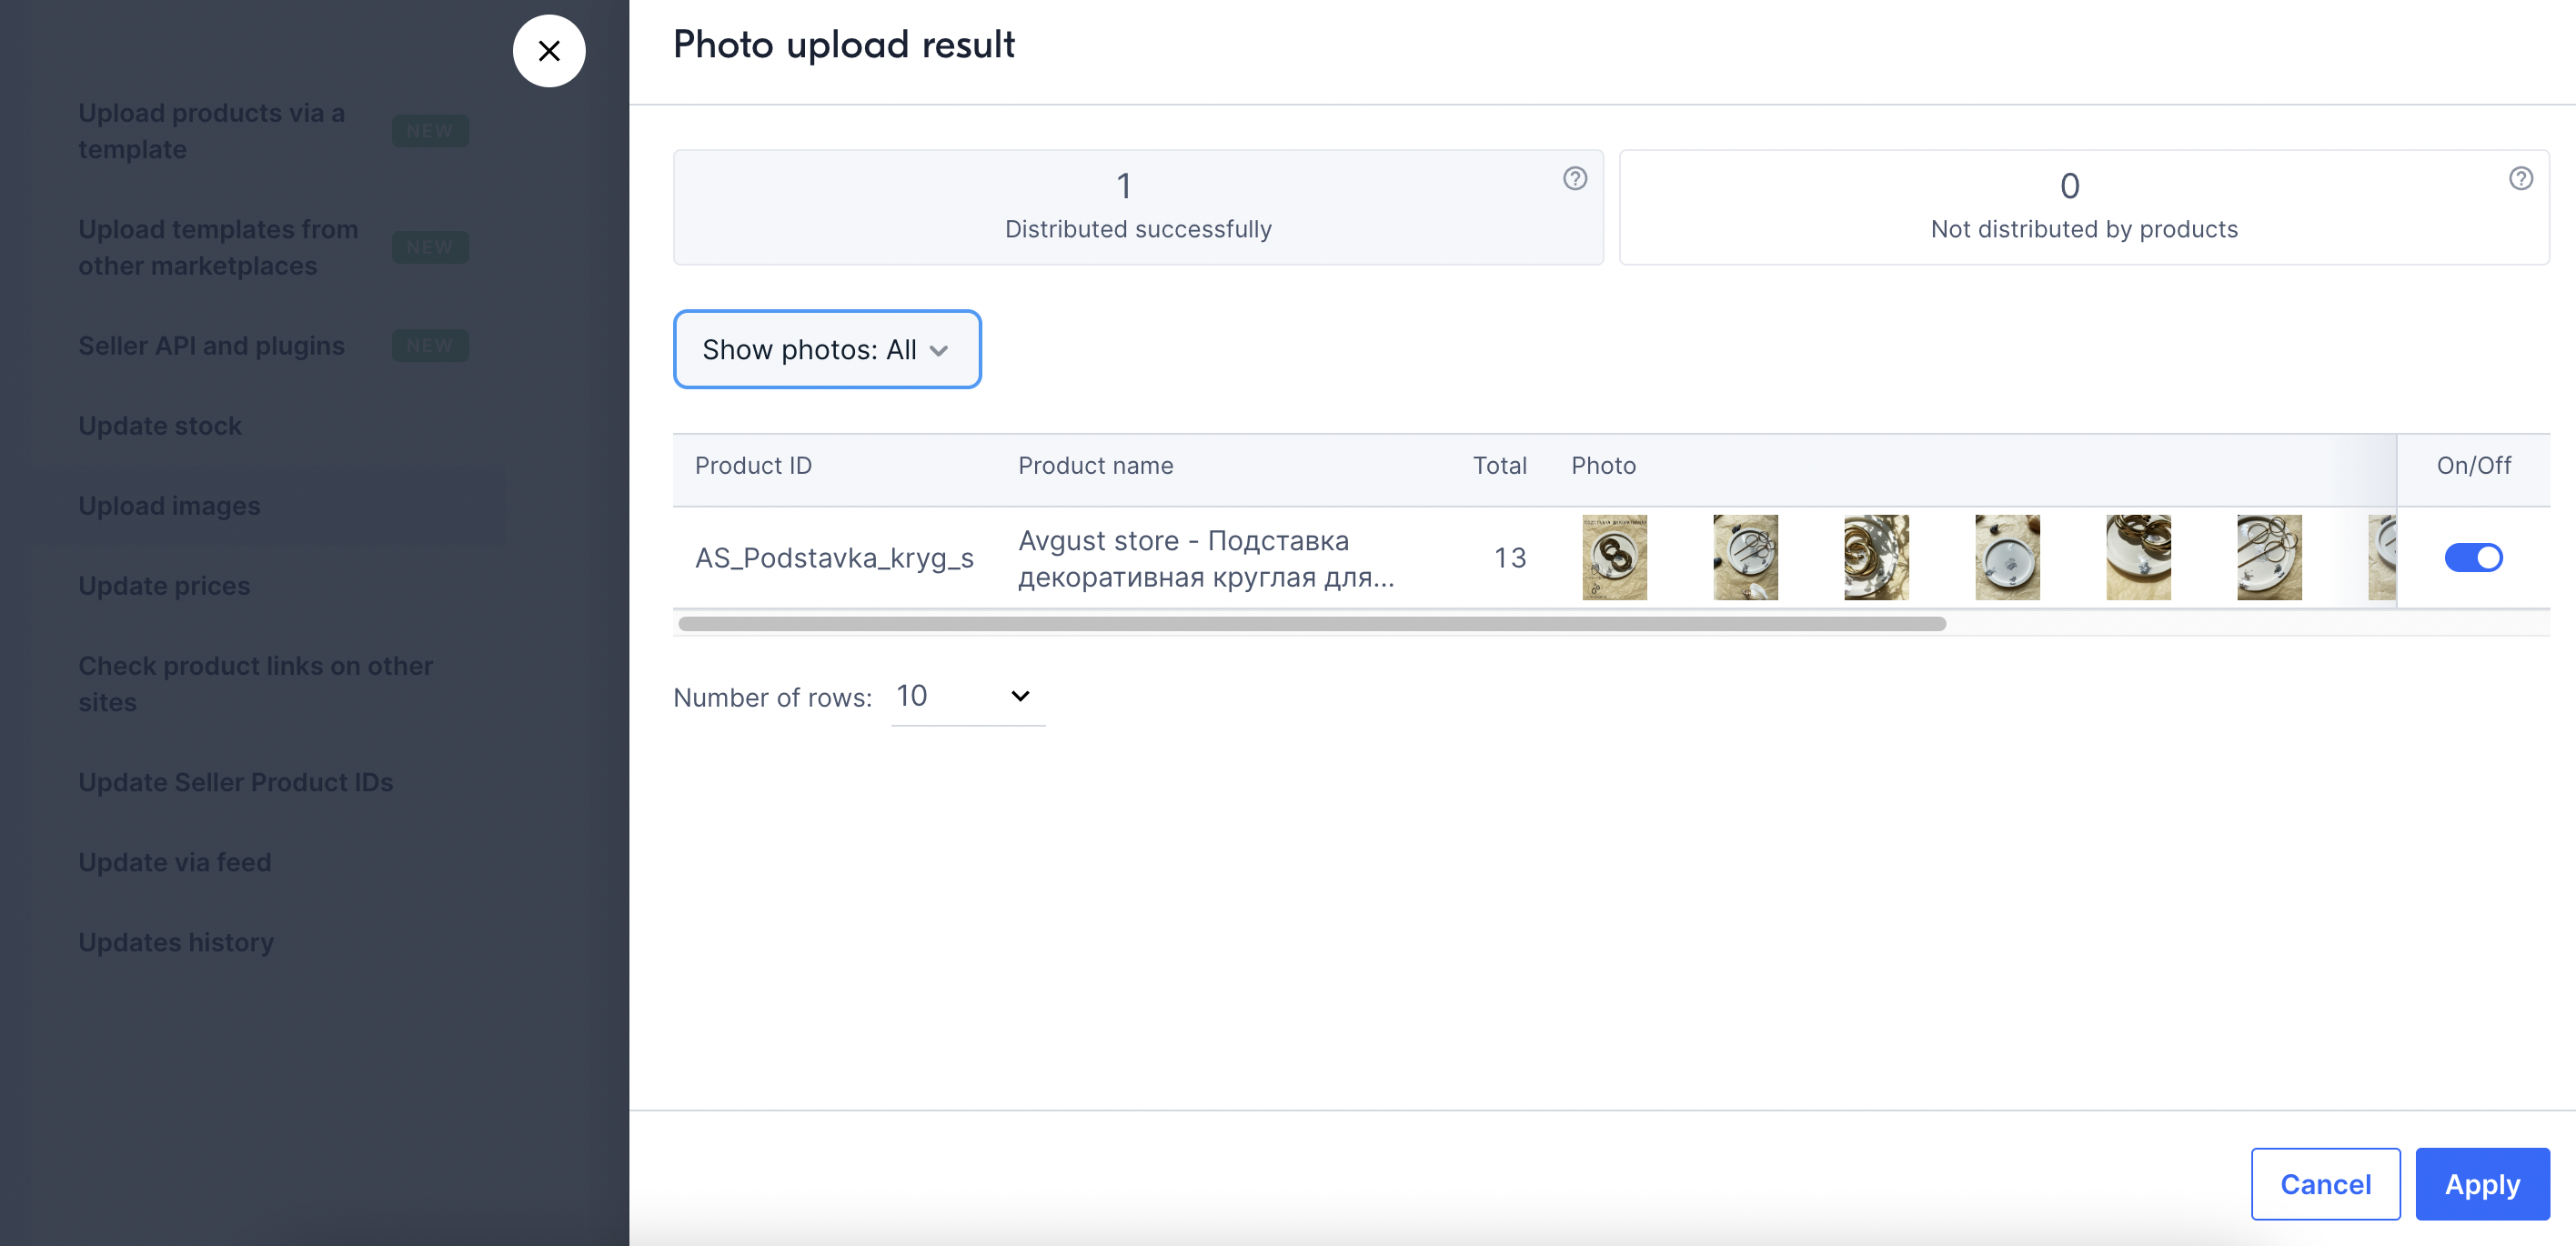
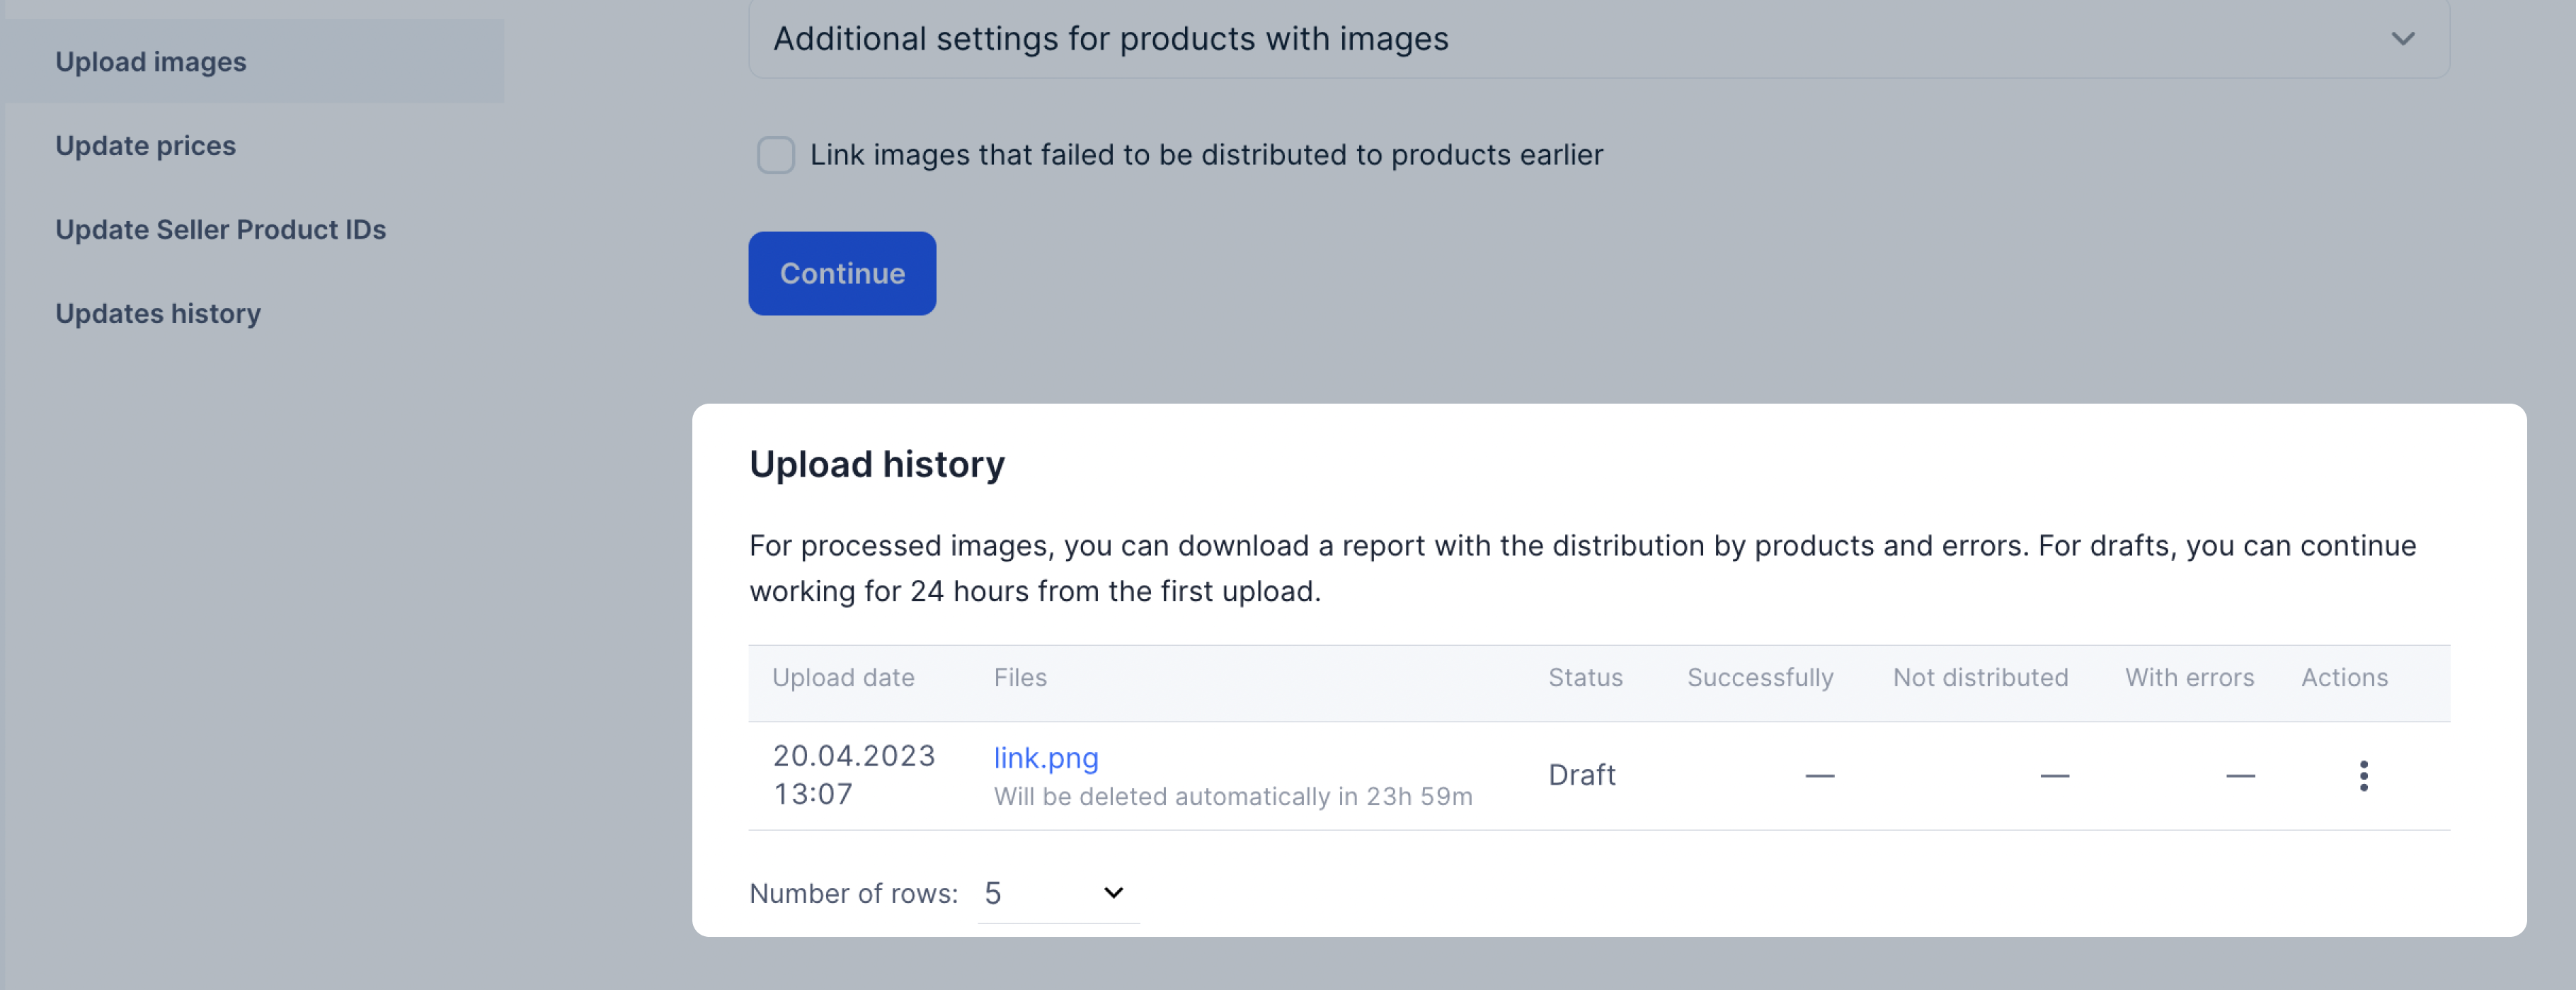
The photos associated with the products will go to the Distributed successfully section. The rest are in the Not distributed by products.
- Click Apply to finish photo linking, or Cancel if you want to save the draft and continue later.
How to work with drafts
You can check which photos from the product list are in the PDP: click the Photo column header and select Photo from the PDP.
Learn more about how to view images
Images that can’t be distributed will go to Images not previously distributed to products before section and will be stored there for another 7 days.
Within this period, you can try to distribute them again using a different linking parameter, or double-check if you selected the right product.
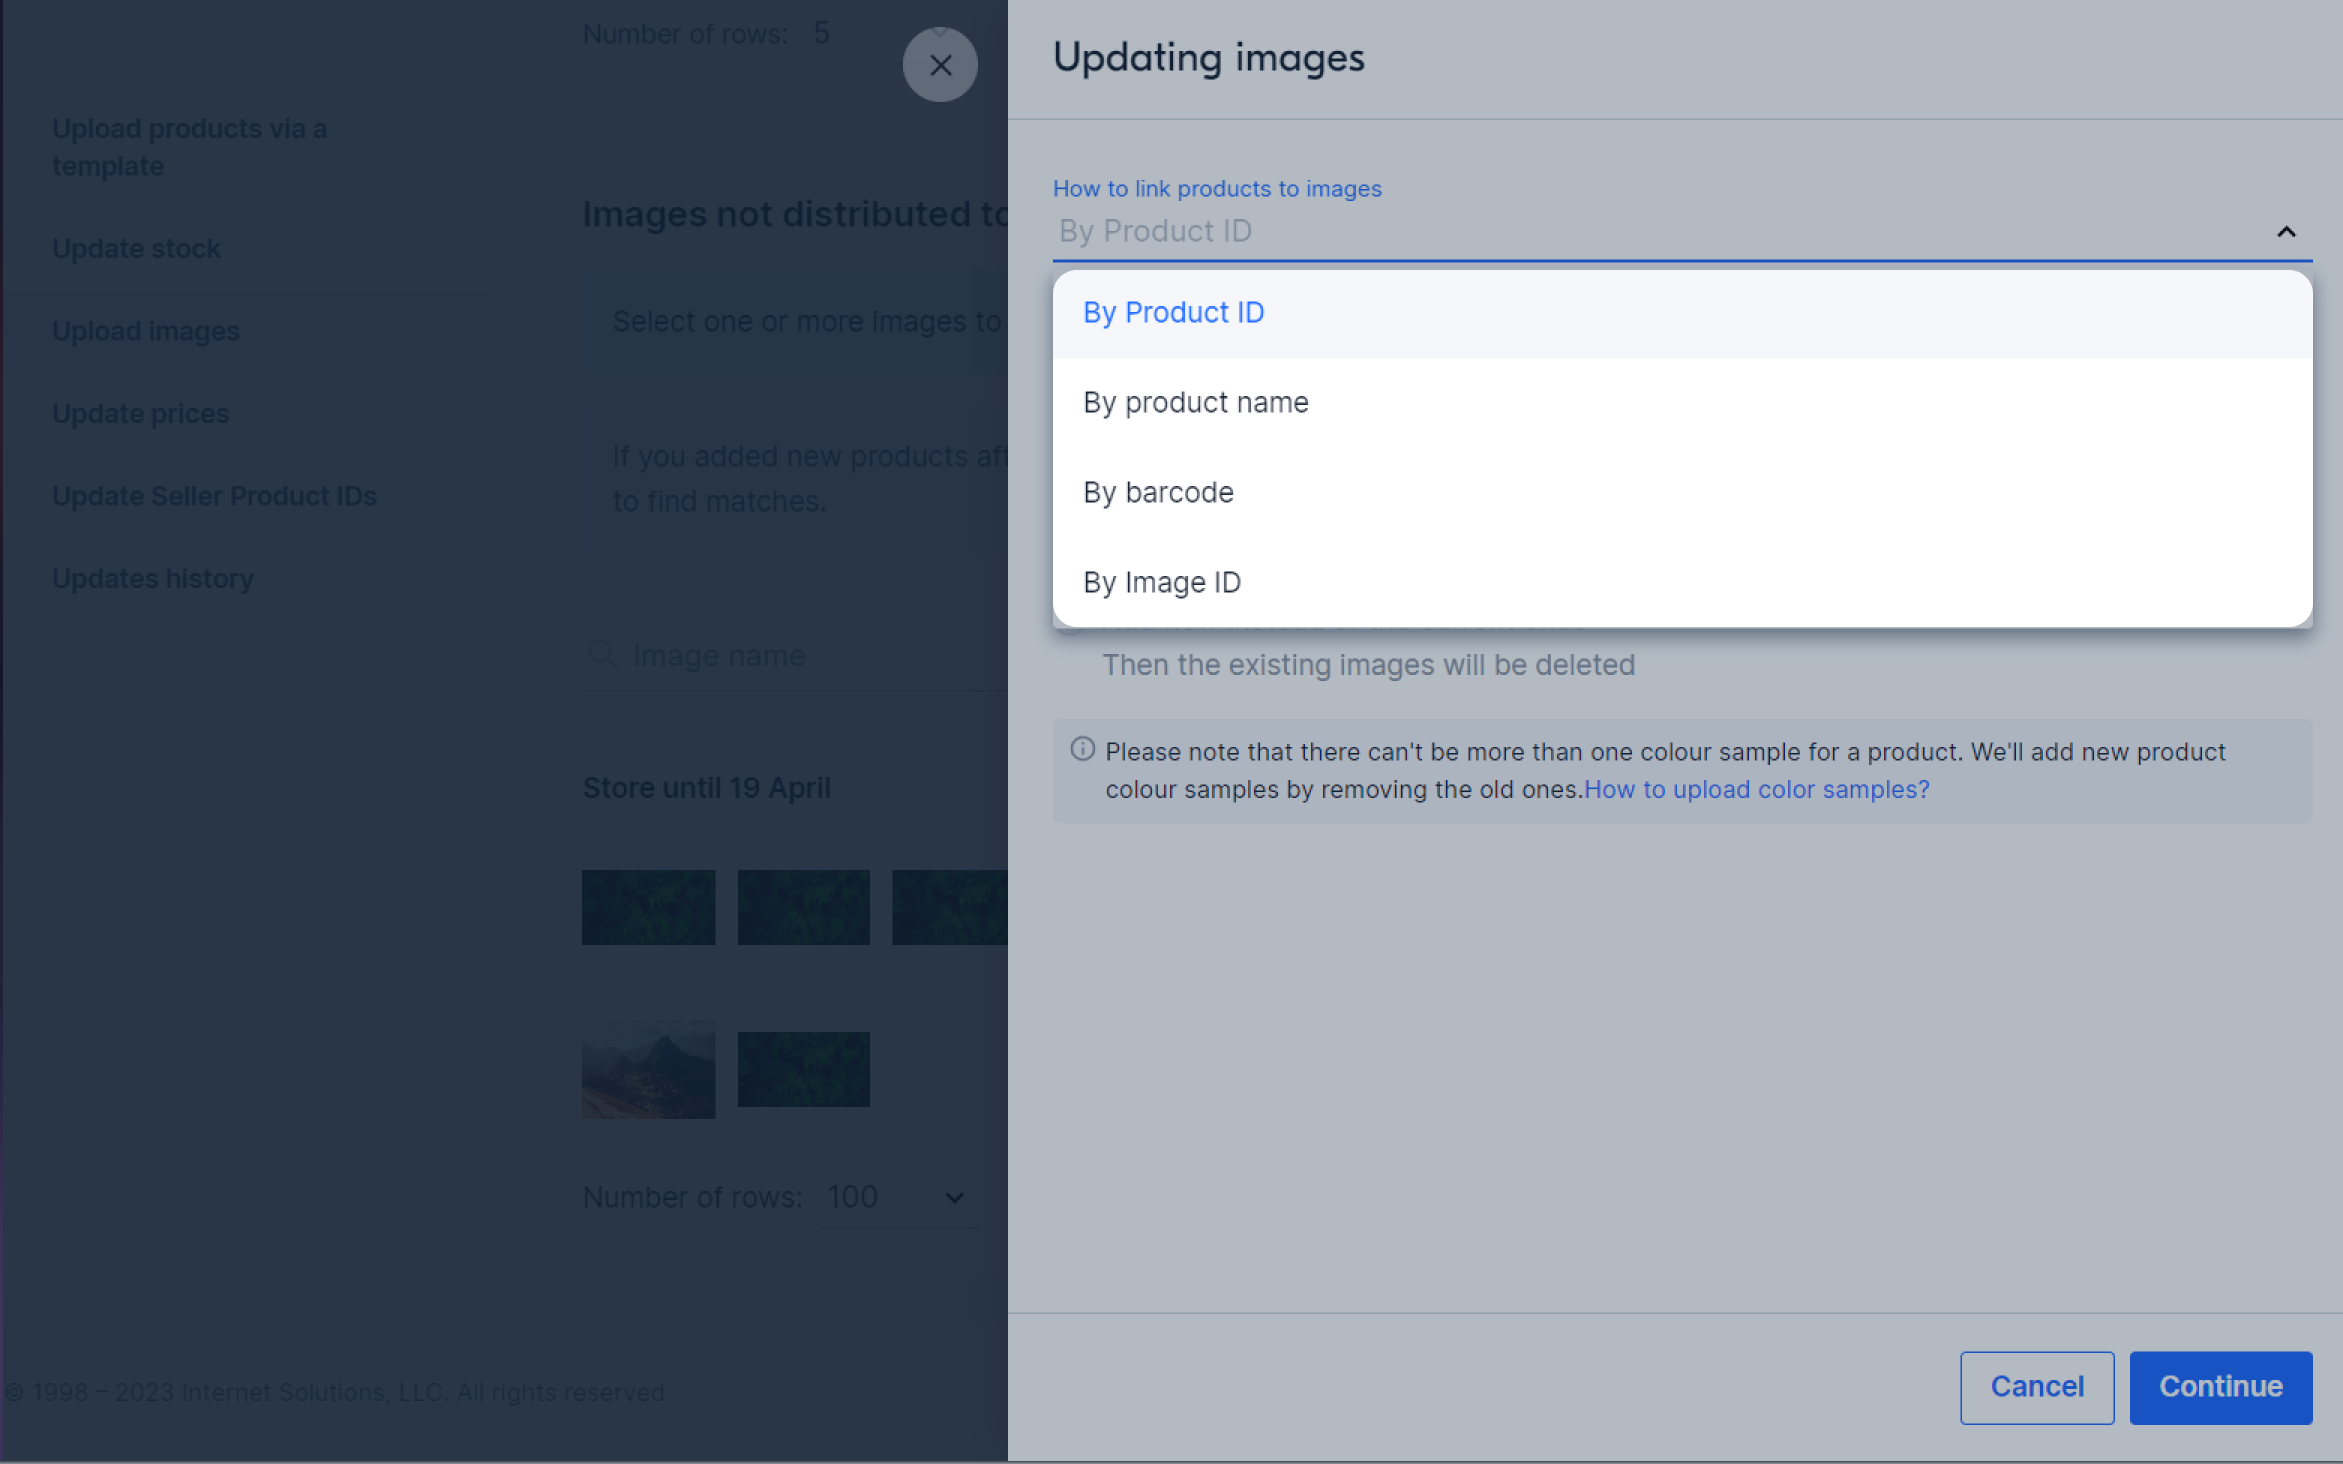
To do this, click Distribute automatically, select a new parameter, for example, not By article code, but By product name. Click Continue.
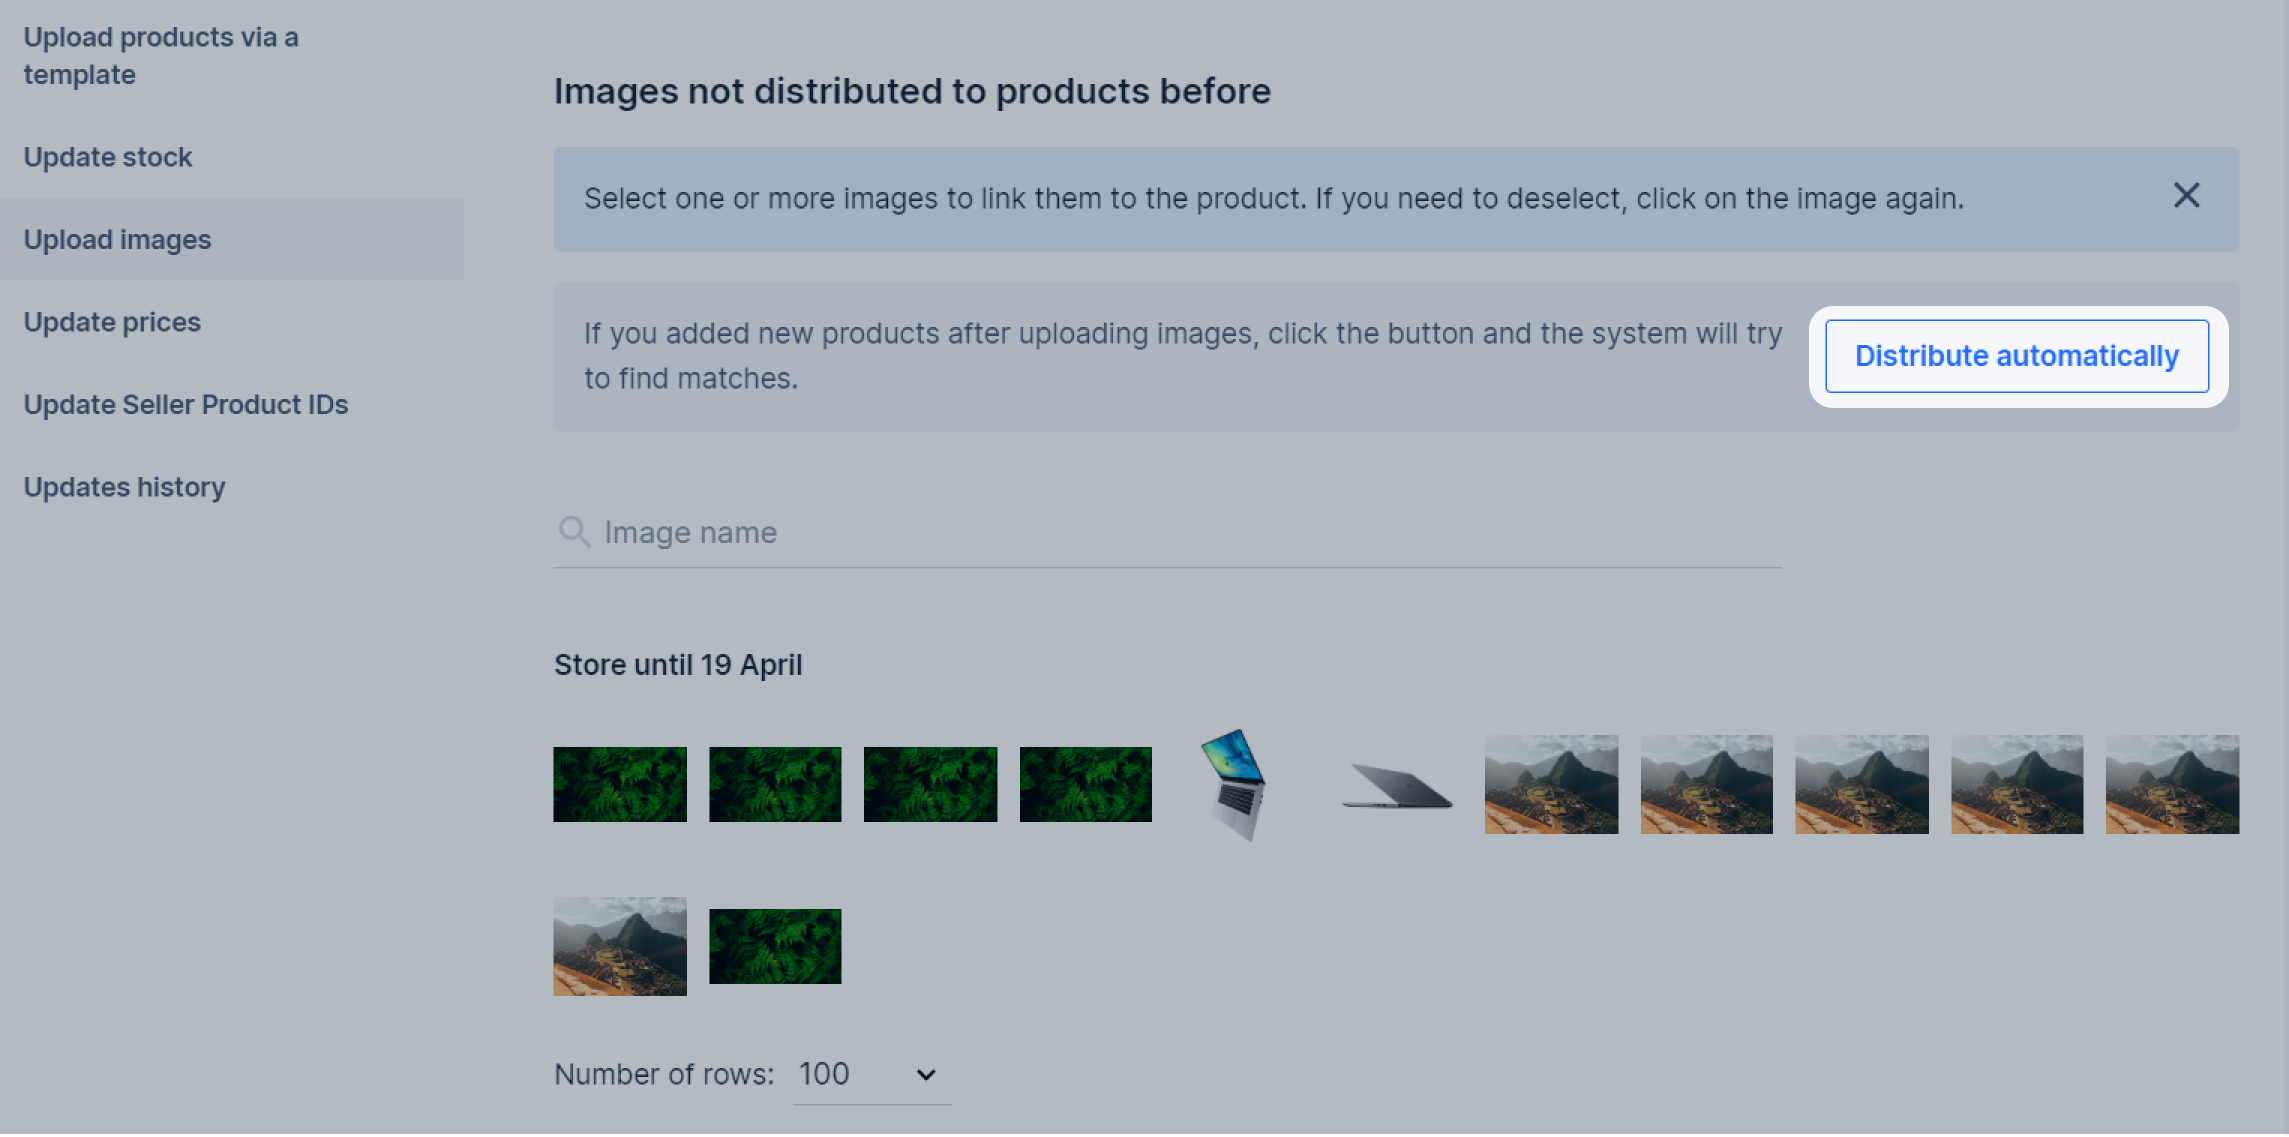
If photos haven’t distributed automatically after a new attempt, you can link them to products manually. To do this, in the
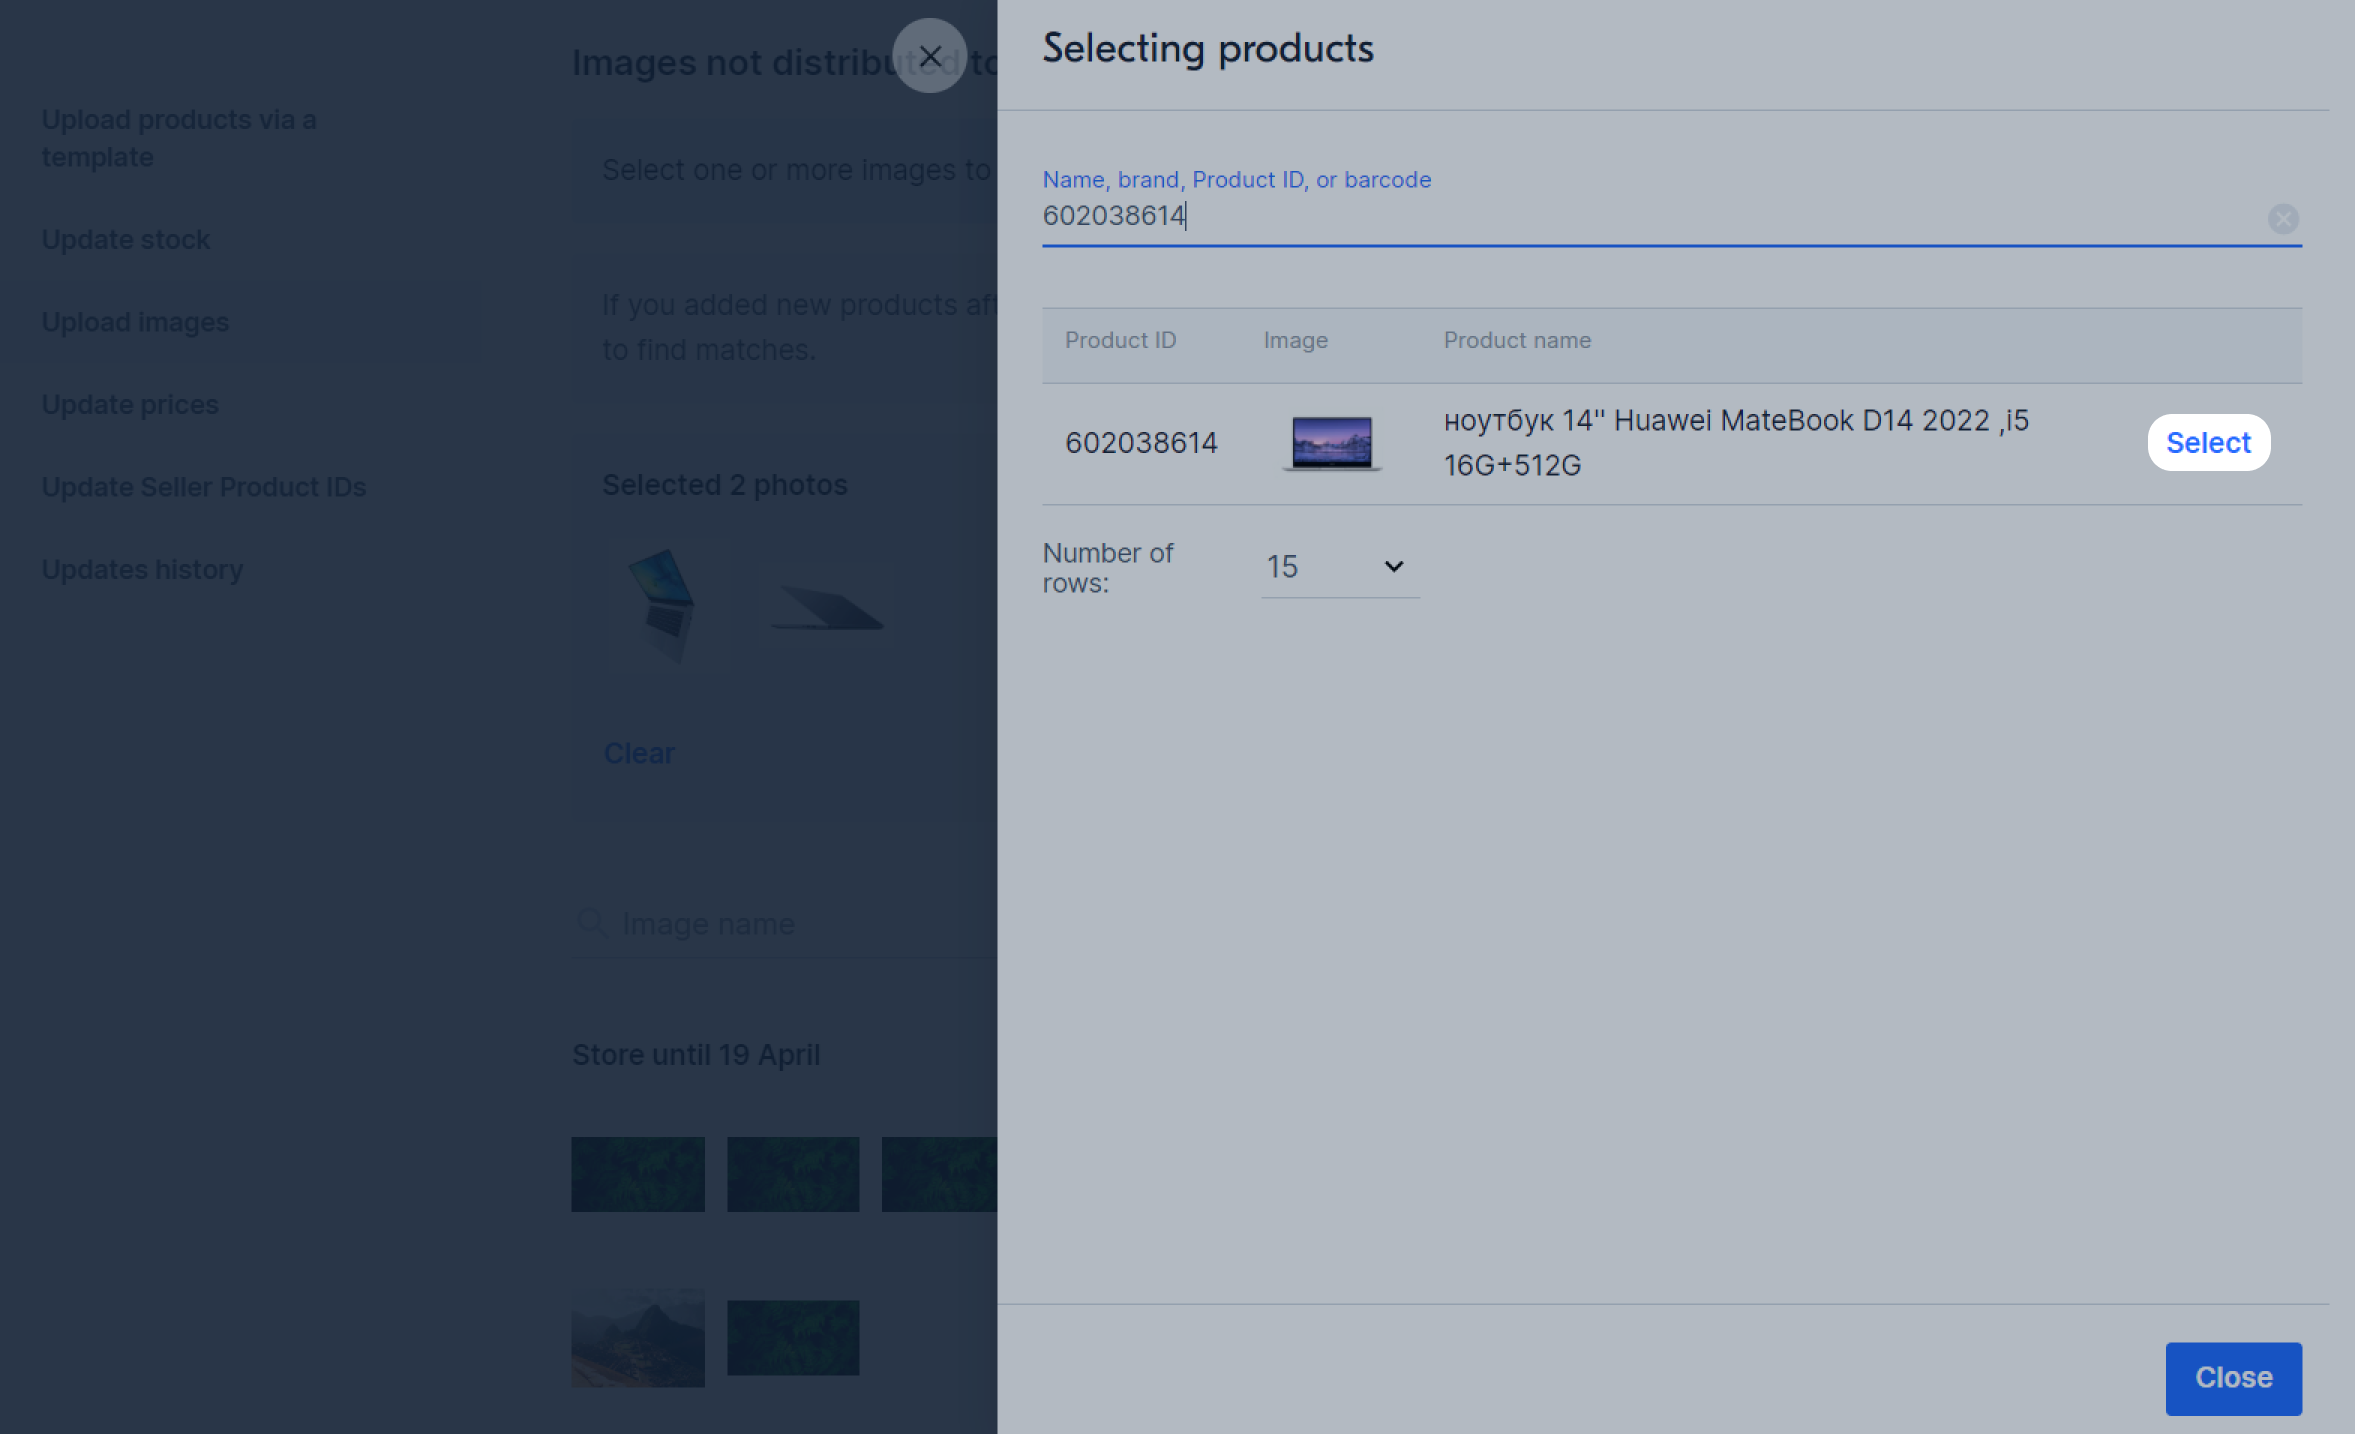
Images not previously distributed to products before section, select the necessary photos and click Link to product. Specify the name,
brand, article code, or barcode and click Select.
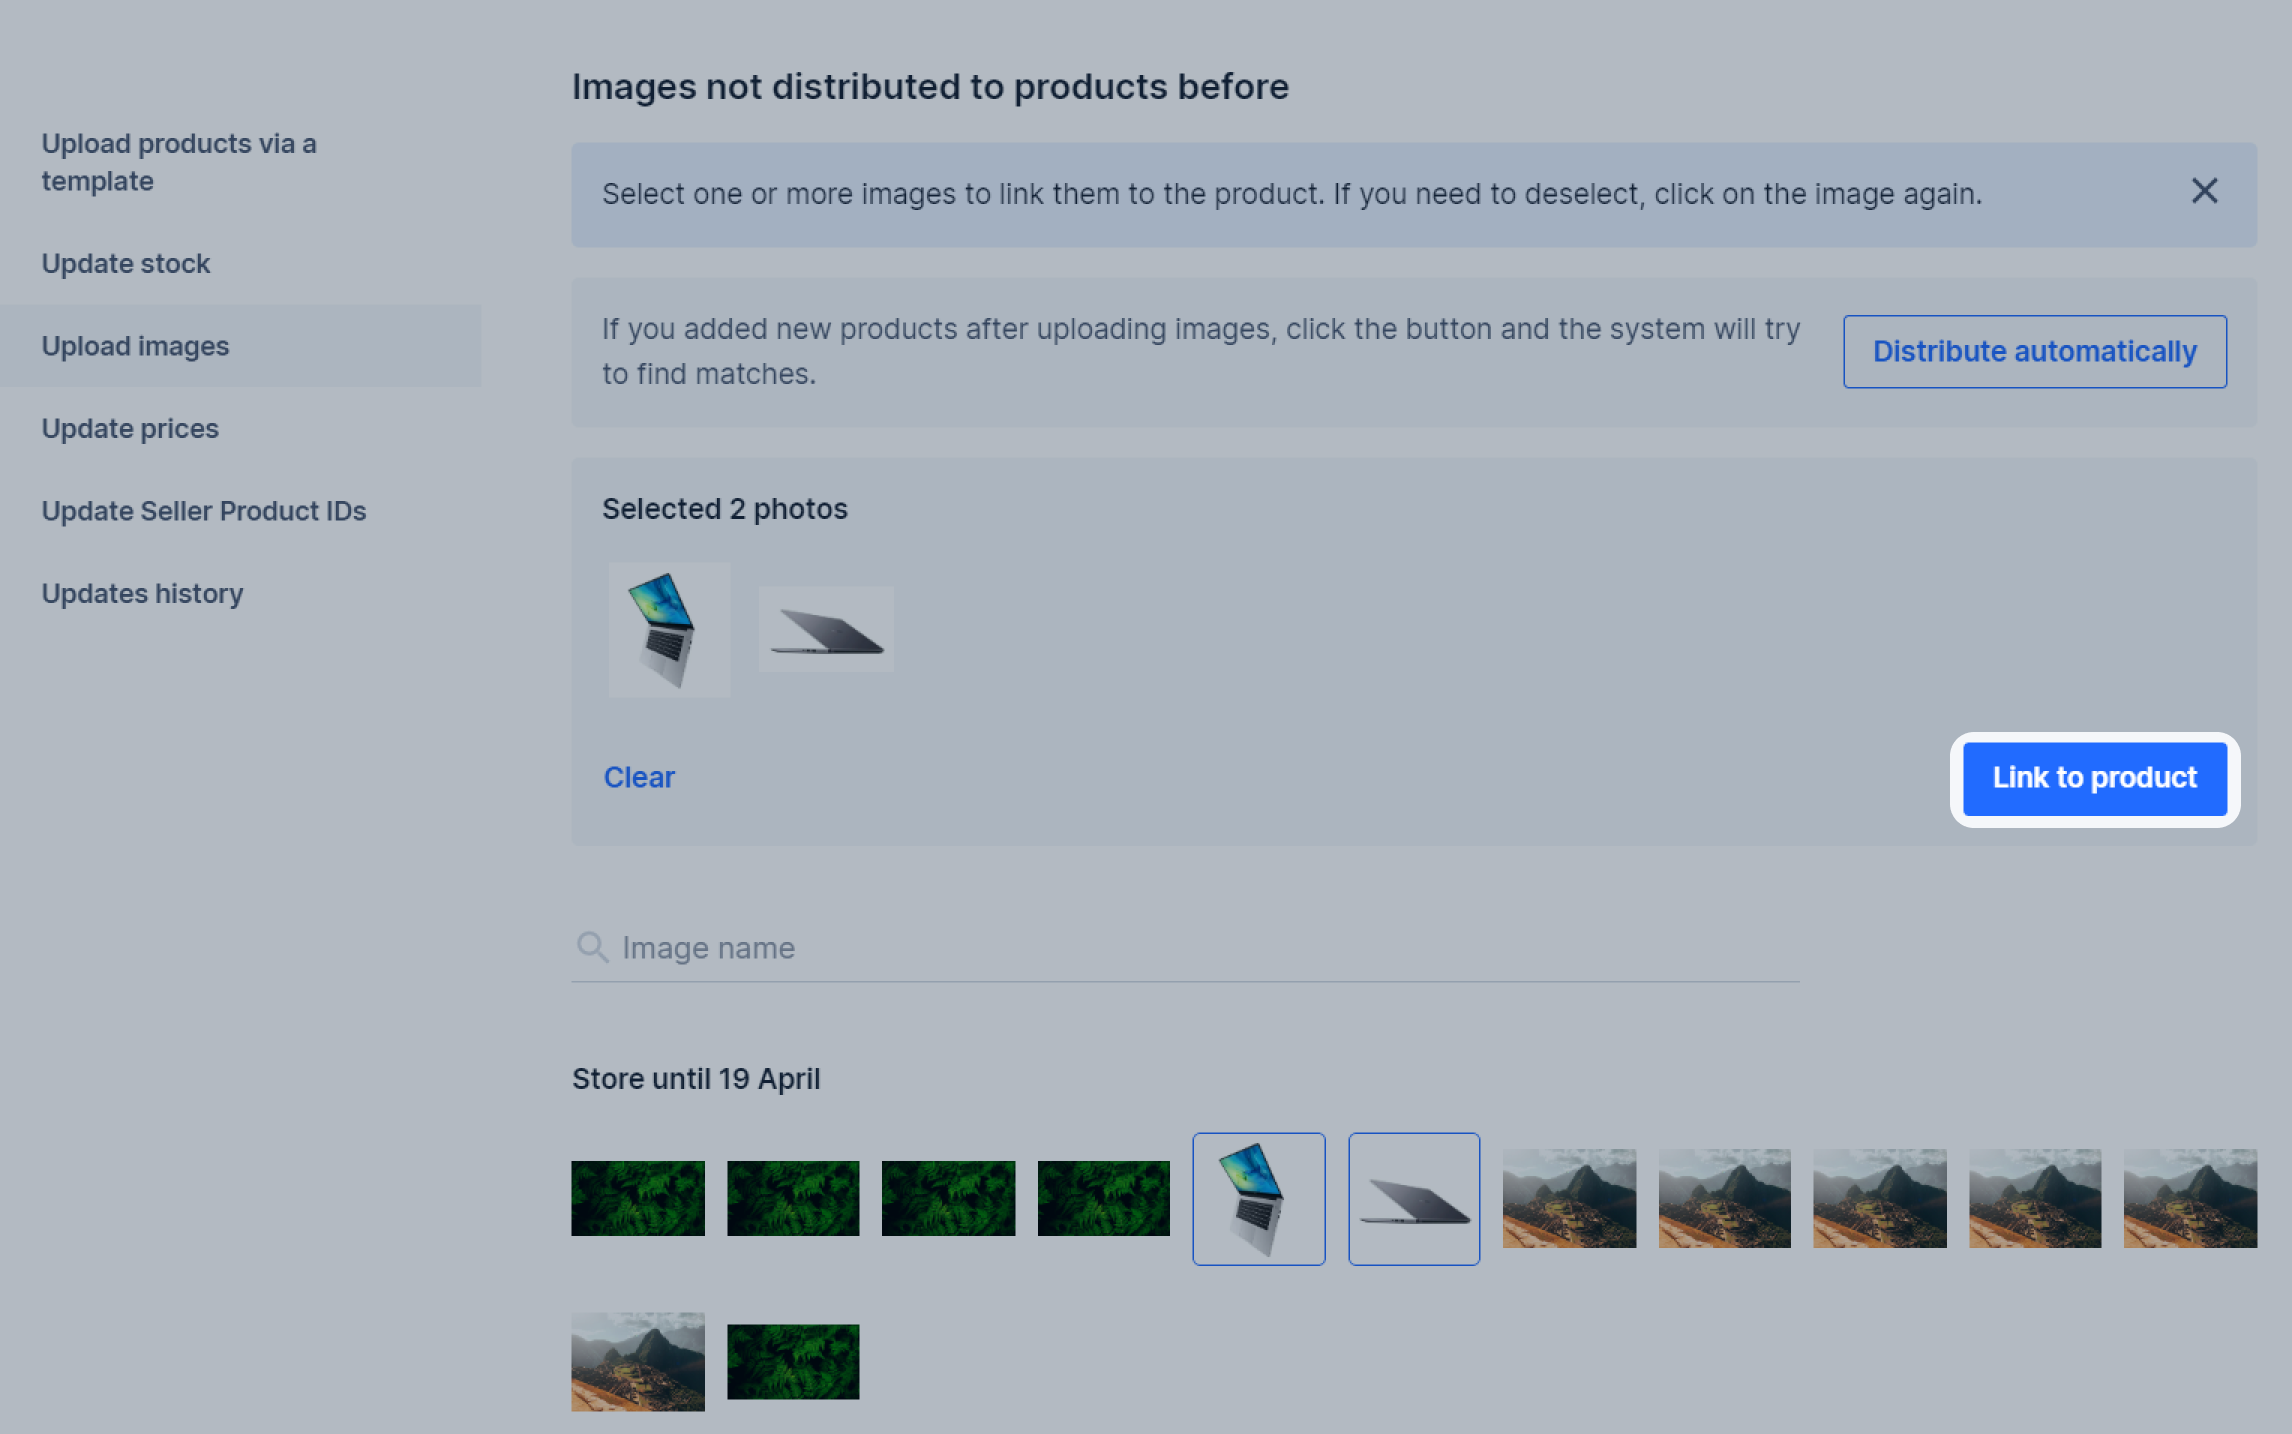
If there are other photos of this product left undistributed, click them and select Move, or drag them to others. When
you select all the necessary photos, click Save.
If you’ve uploaded an XLS file with new products, wait 5–10 minutes before uploading images in this section.
- Create photo ID. It’s an identifier that you need to match the photo with the product. For example, “123white”. Don’t use the / and "" symbols in the photo ID.
- Download an XLS file with a template or online table.
On the Template for supplier tab, fill in the Photo ID field. If you don’t plan to add photos for the product by article code, leave this field empty.
- Upload the XLS file or save the online table. Wait for moderation to pass.
- Download an XLS file with a template. On the Supplier template tab, fill in the Photo ID field. If you don’t plan to add a product photo by ID, leave this field blank.
- Upload the XLS file. Wait for moderation to pass.
- Rename the photo that you want to link to products: specify the photo ID in the name. For example, if the photo ID is “123white”, then name the photo “123white.jpg”. If you need to link several photos to one product, add an underscore and a serial number after the photo ID in the image name, starting from 2: “123white_2.jpg”, “123white_3.jpg”.
- Open the Products and prices → Upload images section.
Select the Photo ID option.
- Upload images. On the right you’ll see how much is uploaded and left and if there are errors.
-
If the products to which you add photos already have images, open Additional settings for products with photos and choose what to do with the current photos in the PDP:
- add new ones after old ones;
- add new ones to old ones;
- replace the current images with new ones.
Click Continue.
The photos associated with the products will go to the Distributed successfully section. The rest are in the Not distributed by products.
-
Click Apply to complete the photo linking or Cancel if you don’t want to link photos or want to save a draft and continue working later.
How to work with drafts
You can check which photos from the product list are in the PDP. Click the Photo column header and select Photos from the PDP.
Images that can’t be distributed will go to Images not previously distributed to products before section and will be stored there for another 7 days.
Within this period, you can try to distribute them again using a different linking parameter, or double-check if you selected the right product.
To do this, click Distribute automatically, select a new parameter, for example, not By article code, but By product name. Click Continue.
If photos haven’t distributed automatically after a new attempt, you can link them to products manually. To do this, in the
Images not previously distributed to products before section, select the necessary photos and click Link to product. Specify the name,
brand, article code, or barcode and click Select.
If there are other photos of this product left undistributed, click them and select Move, or drag them to others. When
you select all the necessary photos, click Save.
You can view details on uploaded photos, drafts and errors in the Upload history block on the Products and prices → Upload images page.
View product images
#
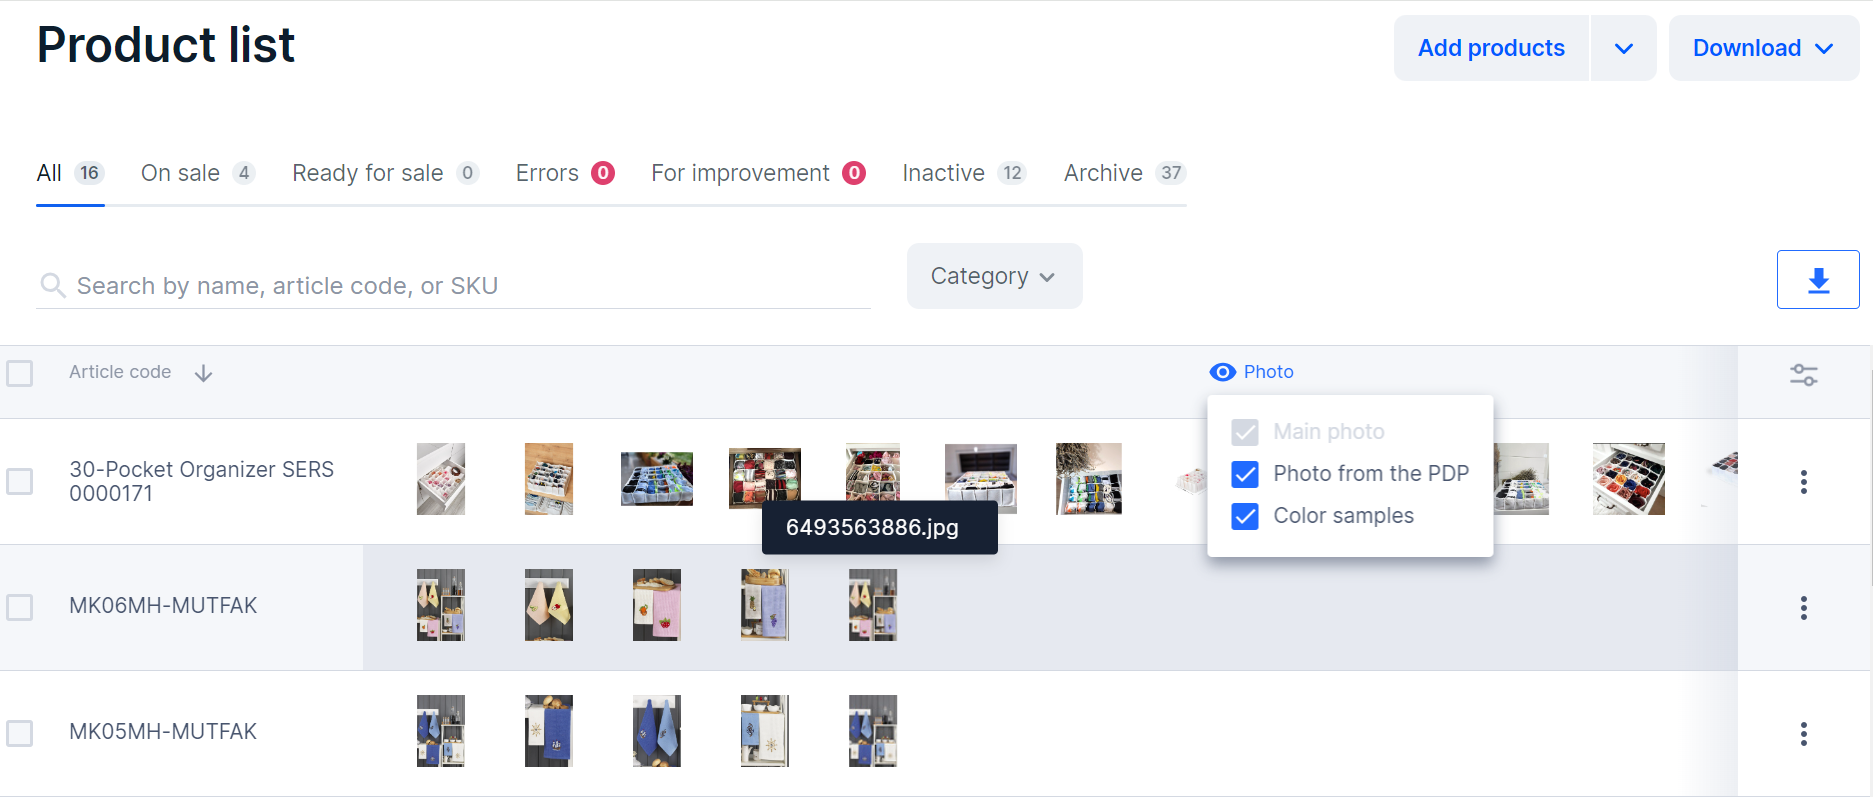
You can view what images your products have. To do this:
-
Open the Products and prices → Product list section.
-
Click on the Photo column heading and mark the Photo from the PDP. The photos will be displayed in the order indicated on the PDP. The last one in the list is a color sample.
-
Hover your cursor over the image to see its name.
Drafts
#
If you stopped working with a photo and saved a draft, you can find it in the Upload history and edit it within 24 hours.
-
Open the Products and prices → Upload images section .
-
In the Upload history select a draft, click
and select Edit draft.
-
Select an action and click Apply.
